
[DevOps] Create your first CI/CD pipeline!!
What is CI/CD pipeline?
A CI/CD pipeline is a series of steps that must be performed in order to deliver a new version of software.A CI/CD pipeline introduces monitoring and automation to improve the process of application development, particularly at the integration and testing phases, as well as during delivery and deployment. Although it is possible to manually execute each of the steps of a CI/CD pipeline, the true value of CI/CD pipelines is realized through automation.
Elements of a CI/CD pipeline
- Build — The stage where the application is compiled.
- Test — The stage where code is tested. Automation here can save both time and effort.
- Release — The stage where the application is delivered to the repository.
- Deploy — In this stage code is deployed to production.
- Validation and compliance — The steps to validate a build are determined by the needs of your organization. Image security scanning tools, like Clair, can ensure the quality of images by comparing them to known vulnerabilities (CVEs).

Tools

Overview

This is what we will create in this article.
What we use?
- Ec2 Ubuntu
- Java, Jenkins, Maven
- Tomcat
- Docker, Jira
- DefectDojo
Setup
1: prepare 2 Ubuntu server . Name one for “Jenkins”. one for “Tomcat” Recommend more than t2.small instance type.

2: make sure you can ssh into the both servers.


Setting up Jenkins server
1: update
sudo apt-get update -y
2: Install Java (Java Runtime Environment)
sudo apt search openjdk
3: Install the JDK
sudo apt-get install default-jdk -y
4: Check your version
ubuntu@jenkins:~$ javac -version
javac 11.0.13ubuntu@jenkins:~$ java -version
openjdk version "11.0.13" 2021-10-19
OpenJDK Runtime Environment (build 11.0.13+8-Ubuntu-0ubuntu1.20.04)
OpenJDK 64-Bit Server VM (build 11.0.13+8-Ubuntu-0ubuntu1.20.04, mixed mode, sharing)
5: Add the Jenkins Repository
curl -fsSL https://pkg.jenkins.io/debian/jenkins.io.key | sudo tee \
    /usr/share/keyrings/jenkins-keyring.asc > /dev/nullecho deb [signed-by=/usr/share/keyrings/jenkins-keyring.asc] \
    https://pkg.jenkins.io/debian binary/ | sudo tee \
    /etc/apt/sources.list.d/jenkins.list > /dev/null
6: install Jenkins
sudo apt updatesudo apt-get install jenkins
7: confirm it is running.
ubuntu@jenkins:~$ sudo systemctl status jenkins
● jenkins.service - LSB: Start Jenkins at boot time
     Loaded: loaded (/etc/init.d/jenkins; generated)
     Active: active (exited) since Fri 2021-12-31 23:28:46 UTC; 57s ago
       Docs: man:systemd-sysv-generator(8)
      Tasks: 0 (limit: 2355)
     Memory: 0B
     CGroup: /system.slice/jenkins.serviceDec 31 23:28:45 jenkins systemd[1]: Starting LSB: Start Jenkins at boot time...
Dec 31 23:28:45 jenkins jenkins[4565]: Correct java version found
Dec 31 23:28:45 jenkins jenkins[4565]:  * Starting Jenkins Automation Server jenkins
Dec 31 23:28:45 jenkins su[4599]: (to jenkins) root on none
Dec 31 23:28:45 jenkins su[4599]: pam_unix(su-l:session): session opened for user jenkins by (uid=0)
Dec 31 23:28:45 jenkins su[4599]: pam_unix(su-l:session): session closed for user jenkins
Dec 31 23:28:46 jenkins jenkins[4565]:    ...done.
Dec 31 23:28:46 jenkins systemd[1]: Started LSB: Start Jenkins at boot time.
Also check the IP + port 8080 to see the console.

Please enter this command to check the password.
sudo cat /var/lib/jenkins/secrets/initialAdminPassword
8:install the suggested plugins


After the plugins installation, go to the console and choose “manage jenkins”


we need these ones. Start installing without restart


After completing that,


9:Install Docker
Update the apt package index and install packages to allow apt to use a repository over HTTPS:
sudo apt-get updatesudo apt-get install \
    ca-certificates \
    curl \
    gnupg \
    lsb-release
Add Docker’s official GPG key:
curl -fsSL https://download.docker.com/linux/ubuntu/gpg | sudo gpg --dearmor -o /usr/share/keyrings/docker-archive-keyring.gpgUse the following command to set up the stable repository. To add the nightly or test repository, add the word nightly or test (or both) after the word stable in the commands below.
echo \
  "deb [arch=$(dpkg --print-architecture) signed-by=/usr/share/keyrings/docker-archive-keyring.gpg] https://download.docker.com/linux/ubuntu \
  $(lsb_release -cs) stable" | sudo tee /etc/apt/sources.list.d/docker.list > /dev/null
Install Docker Engine
Update the apt package index, and install the latest version of Docker Engine and containerd, or go to the next step to install a specific version:
sudo apt-get updatesudo apt-get install docker-ce docker-ce-cli containerd.io
List the versions available in your repo:
apt-cache madison docker-ce
Install a specific version using the version string from the second column, for example,
sudo apt-get install docker-ce=5:20.10.12~3-0~ubuntu-focal docker-ce-cli=5:20.10.12~3-0~ubuntu-focal containerd.ioVerify that Docker Engine is installed correctly by running the hello-world image.
sudo docker run hello-worldUnable to find image 'hello-world:latest' locally
latest: Pulling from library/hello-world
2db29710123e: Pull complete
Digest: sha256:2498fce14358aa50ead0cc6c19990fc6ff866ce72aeb5546e1d59caac3d0d60f
Status: Downloaded newer image for hello-world:latestHello from Docker!
This message shows that your installation appears to be working correctly.To generate this message, Docker took the following steps:
 1. The Docker client contacted the Docker daemon.
 2. The Docker daemon pulled the "hello-world" image from the Docker Hub.
    (amd64)
 3. The Docker daemon created a new container from that image which runs the
    executable that produces the output you are currently reading.
 4. The Docker daemon streamed that output to the Docker client, which sent it
    to your terminal.To try something more ambitious, you can run an Ubuntu container with:
 $ docker run -it ubuntu bashShare images, automate workflows, and more with a free Docker ID:
 https://hub.docker.com/For more examples and ideas, visit:
 https://docs.docker.com/get-started/
check the status
ubuntu@jenkins:~$ sudo systemctl status docker
● docker.service - Docker Application Container Engine
     Loaded: loaded (/lib/systemd/system/docker.service; enabled; vendor preset: enabled)
     Active: active (running) since Fri 2021-12-31 23:40:27 UTC; 4min 55s ago
TriggeredBy: ● docker.socket
       Docs: https://docs.docker.com
   Main PID: 6261 (dockerd)
      Tasks: 9
     Memory: 34.4M
     CGroup: /system.slice/docker.service
             └─6261 /usr/bin/docke
Lets add our username to the docker group
sudo usermod -aG docker jenkinsinstall maven
sudo apt updatesudo apt install mavenubuntu@jenkins:~$ mvn -version
Apache Maven 3.6.3
Maven home: /usr/share/maven
Java version: 11.0.13, vendor: Ubuntu, runtime: /usr/lib/jvm/java-11-openjdk-amd64
Default locale: en, platform encoding: UTF-8
OS name: "linux", version: "5.11.0-1022-aws", arch: "amd64", family: "unix"
Setting up Tomcat server
1: install java (please see the previous steps)
ubuntu@tomcat:~$ java -version
openjdk version "11.0.13" 2021-10-19
OpenJDK Runtime Environment (build 11.0.13+8-Ubuntu-0ubuntu1.18.04)
OpenJDK 64-Bit Server VM (build 11.0.13+8-Ubuntu-0ubuntu1.18.04, mixed mode, sharing)
2: install tomcat
mkdir /prod
cd /prod
sudo wget https://dlcdn.apache.org/tomcat/tomcat-9/v9.0.56/bin/apache-tomcat-9.0.56.zipsudo apt install unzipsudo unzip apache-tomcat-9.0.56.zip
3: start tomcat
cd apache-tomcat-9.0.56/binchmod +x catalina.shubuntu@tomcat:/prod/apache-tomcat-9.0.56/bin$ sudo bash startup.sh
Using CATALINA_BASE:   /prod/apache-tomcat-9.0.56
Using CATALINA_HOME:   /prod/apache-tomcat-9.0.56
Using CATALINA_TMPDIR: /prod/apache-tomcat-9.0.56/temp
Using JRE_HOME:        /usr
Using CLASSPATH:       /prod/apache-tomcat-9.0.56/bin/bootstrap.jar:/prod/apache-tomcat-9.0.56/bin/tomcat-juli.jar
Using CATALINA_OPTS:
Tomcat started.

we can see it is running.
4: config settings (For tomcat 9)
sudo vi /prod/apache-tomcat-9.0.56/webapps/manager/META-INF/context.xml
Please comment out
- add
<role rolename="manager-gui"/> - add
<user username="tomcat" password="<yourpassword>" roles="manager-gui"/>

Also, we need to add the username
cd ../bin/ubuntu@tomcat:/prod/apache-tomcat-9.0.56/bin$ sudo bash shutdown.shubuntu@tomcat:/prod/apache-tomcat-9.0.56/bin$ sudo bash startup.sh

Creating build pipeline in Jenkins
create a new item (pipeline)


Provide a name for your new item (e.g. Pipeline webapp) and select Multibranch Pipeline

Click the Add Source button, choose the type of repository you want to use and fill in the details.
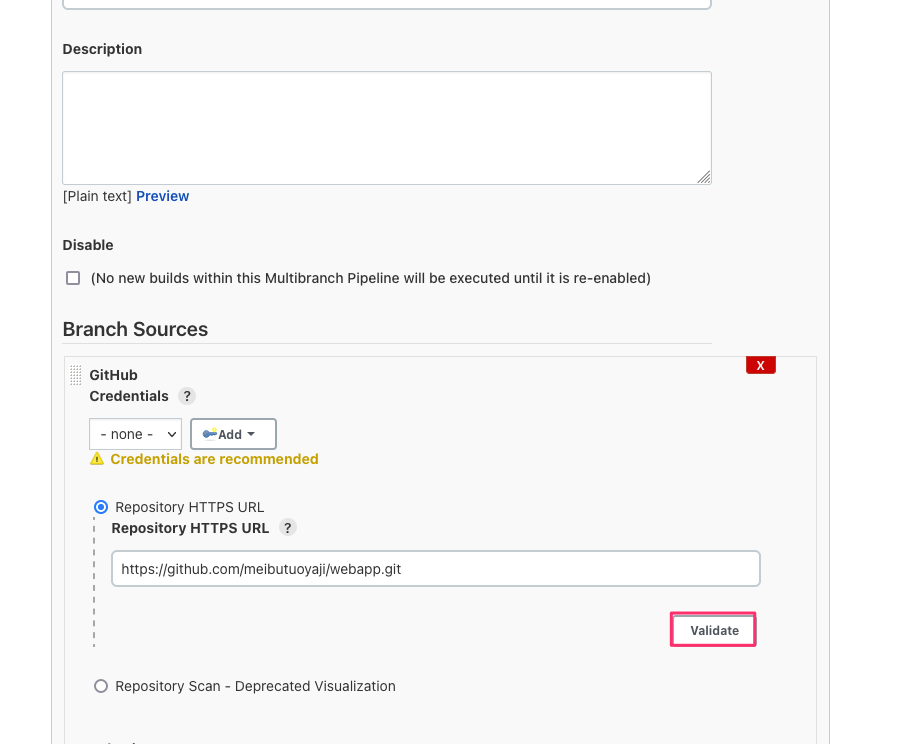
put your GitHub repo address and click validate.

It shows ok if there is no credentials and click save.
After saving that, you can see it on the console.

Go to the GitHub repos you put in the preveious steps and create new file there.

Make a file called “jenkinsfile” and the inside
pipeline {
    agent { docker { image 'maven:3.8.4-openjdk-11-slim' } }
    stages {
        stage('build') {
            steps {
                sh 'mvn --version'
            }
        }
    }
}

