Mar 25, 2011

Things to Know if You Plan on Working Abroad

Searching for a job abroad is becoming more common every year. Many people go past the border of their own country to look for a life elsewhere. The reasons vary, it may be because of better financial prospects, it may be because of a better environment. Whichever the case – been there, done that.
So if you are thinking about packing your bags and getting on a plane, you might want to consider what you can expect, so you’re ready and prepared, when the time comes to board that plane.
As mentioned, I actually did go through a couple of countries in recent years and worked at various companies while doing it. I’ve learned a number of things while doing it, and hopefully some of the things I’ve learned will help you.
Of course I’m presuming you are looking for a job somehow related to design/coding etc., not construction or such.

Things to Know if You Plan on Working Abroad Okay then, let’s try to create a list with various factors you’ll need to take into consideration. Let’s start with:

Are you ready?


Yeah, are you? That’s the most basic question you have to ask yourself. Strong will and good intentions will only get you so far. It’s not exactly a picnic out there, so be sure your plan is as bullet proof as possible.
First point:

Are you good?

Look objectively at your own skills. Imagine you actually landed the job you’re aiming for and think about things that your boss might need of you. Are you capable of delivering all of them? Have some friends working already at a similar position? Ask them about their daily tasks and challenges, make sure you won’t get eaten alive out there. It’s going to be really tough if you suddenly realize you can’t do your own job when you’re already in another country. Be sure that your technical skills are at least decent. Truth be told, you are probably going to have to be considerably better than the natives you’re going against if you want to have a chance.
Finally, there is the talent factor. It’s pretty common knowledge that a lack of talent can be made up with hard work, but if you ask me, the ability to work hard is a talent in itself. Either way, the real question here is – are you better than the average person? If you can’t objectively evaluate yourself, have someone who has knowledge in the area do it.
So if by the end of the day you indeed figure out you’re skilled and ready, we can move on.

Complex Skills

We already talked about finding out if you’re capable of tackling the common, daily challenges in your field of work (whether current or future). You’ll have to take into consideration the various types of companies that may require different skill sets.
It’s mostly related to the companies’ size. In smaller companies, your boss will more often than not expect you to be able to work with various programs and be able to pretty much do everything by yourself. Bigger companies understand the idea of specialization much better. Unfortunately, your chances of getting work in the former are usually much more probable than the latter.
So you may want to gain some knowledge in related fields. For example, if you are a designer specializing in Photoshop, make sure you have some knowledge of programs like Illustrator or InDesign as well. If you’re a coder, you might want to make sure you are capable of understanding various coding languages.
I’m very well aware that narrowing your field of work allows you to become much better in what you do, but the small companies just can’t afford to hire different people for everything. Not to mention, that knowing the limitations of other technologies and programs is essential to work well in a team.

Is there a need for you?

I, actually at one point, found myself living in Iceland just before the country almost went bankrupt. If other people tell you that the financial crisis was hard for them, tell them to look at people who worked in advertising.
Suddenly the whole world (or at least most of it) found it necessary to spare money wherever they could. So the amount of money being spent on advertising dropped drastically and while this article is not supposed to be a history lesson, I am trying to make a point that your chances of finding work are very strongly tied to the amount of work out there.
During my quests to find a job in various countries (about five times in the past four years) one thing stood out: the amount of positions for coders greatly outnumber the ones for designers. I would imagine that’s still the case. The reason is quite simple as well – it’s much easier to learn the basics of Photoshop then it is to learn the basics of coding.
You can’t really make any kind of generalization here though. Different  regions will have different needs and available workforce. Hence, if you have any particular place in mind, you might want to do some research regarding those in the area.
School
The title itself pretty much explains a lot, but let’s get through it anyway. Whether you can or cannot put a school degree connected to your field of work on your CV will have a varying impact (never a positive though) on your chances of landing a job. Why? Because it depends not only on the places you apply to but the countries in which you apply as well.
I’m well aware we cannot make a complete generalization here and it’s not my intent by any means. In the same town you will find different company owners may care more or less about whether you have a degree. That being said, I have noticed that people in some countries tend to lean more in one direction. For example in Germany (in my experience) it really matters whether you have a degree or not, Danish folks are open to the subject, but would like to see one anyway. On the other hand, the people I spoke with in Netherlands seemed to care more about what you can actually do, I think I only heard a question regarding a degree once. Iceland and Poland seemed completely alien to the subject of a school degree.
So yeah, don’t take those as a general rule, but I for one will definitely stand by the opinion that different cultures have different approaches to the same subjects.

Experience

Goes hand in hand with a school degree. Your really want to be able to show that you have experience. Even if it is freelancing – put it in, the fact that you don’t have someone breathing down your neck does not mean it’s not a genuine source of knowledge and experience. By the end of the day, searching for work is not about modesty. Put anything you can out there, your goal is to impress these people, you won’t do that with puppy eyes alone.
If you’ve been looking at some job offers on the Internet, in the papers or anywhere else, you probably noticed by now that usually two things keep coming up – degree and experience. If you don’t have the first one you can actually manage to work your way around it, without experience though you’re in a world of trouble. So start getting some if you’re not already.
As I mentioned, even freelancing will help you and it’s not an occupation you can get fired from or not get accepted to.

Your Portfolio and CV

I’m well aware there are lots of CV templates on the Internet which are perfectly fine and do their job decently. Make no mistake though, you are applying for a creative job, so a visually outstanding CV can help you get your foot in the door.
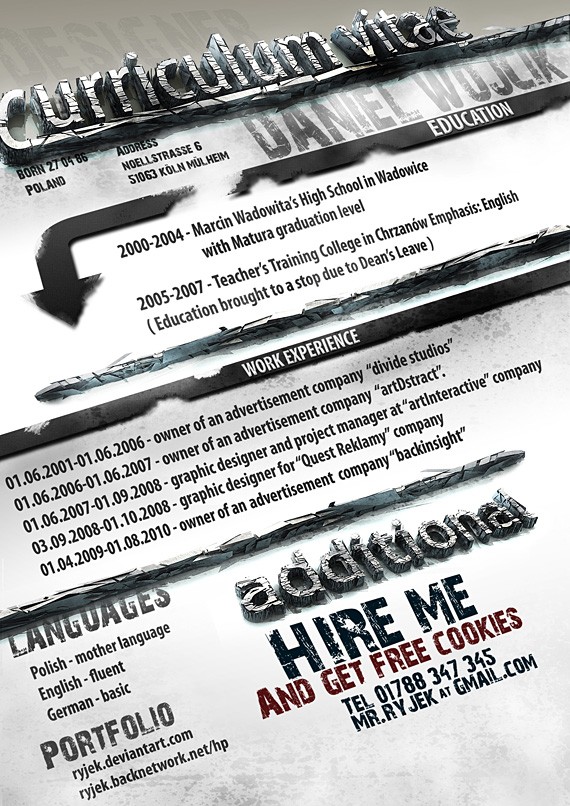
At first I was walking around with a portfolio in one hand and a plain, clean CV in the other. Sometimes I managed to have a long talk with my potential employers, sometimes it didn’t even last a minute. Then I changed my CV to the following one:

The outcome was that every single person I showed it to was at least initially interested, some of them even despite having no free positions.
So my new CV made them grab the bait, then I replaced the CV in front of them with a printed out portfolio created with a similar approach. That’s pretty much my ultimate technique I’ve came up with after dozens of meetings. Feel free to copy me.
What if you’re a coder though? In that case you probably don’t possess the necessary skills to make an unconventional CV. Others do though. It may be a good time to invest some money in yourself and hire someone to do it for you. After all, if you land a job because of it, it’s going to pay off.
An unconventional CV though brings one particular issue with it. The style of it may not be that of your potential employer.
There are two main distinctions. A clean design and a flashy one. From what you can see, I obviously went for the second. If I had to talk with people in expensive suits though, I took the “normal” one. Do some research on where you are going to as well.
Actually you want to do that regardless of the fact if you have different versions of CV or not.

Legal issues


So we’re done with the preparations regarding getting yourself ready personally, the problems don’t end there though. Every country has different laws regarding work. If you’re a member of the European Union and seek employment in another country in the EU, then you will have it much easier. That’s not always the case though.
Neither this article, nor the blog itself, is aimed at the legal issues of working abroad, but I can’t just skip the subject all together either. So I’ll just run some basic things by you, then you will probably want to gather some more knowledge from other sources.

Getting your permits down

Might not be as simple as you think. For example in Denmark I had to have a job contract to present to the local authorities before I could apply for a permit to stay in the country (that, or having a lot of money in the account to show). In Iceland getting everything you need literally comes down to a couple of visits in two or three places and within a week you have everything done. In Germany the main problems were just figuring out how to do everything in compliance with various rules which may be quite time consuming but less confusing, then in other places.
As you see, the way of getting past the legalities may vary greatly so just remember to check the laws where you want to go. I’ve seen people deported or get into a world of financial troubles due to lack of knowledge regarding local laws.
I can’t stress enough how important it is to get a work contract from your employer as soon as possible. Without it you might have a problem with even renting a place to stay.

Your shortcomings


Right, so let’s try to get into the shoes of your potential employer and think why we would NOT hire you. In other words, why you are less attractive as a worker then a native version of you.

The language barrier

The first and maybe the biggest barrier. If you don’t speak the local language you’re in trouble. On one hand you can claim, that if you find a place where everyone speaks English (presuming, that you speak it yourself) then you should be fine. While it’s true in a sense, it does not solve the whole problem.
If you do not speak the local language, you will have lots of trouble in your daily work. If you do not know what the words mean, then you can’t effectively design a poster or anything else using text for that matter. In smaller companies the designers/coders themselves are actually asked sometimes to speak with the clients, needless to say it’s a bit out of the question if you cannot comprehend their language.
The amount of disadvantages is quite big and with a little thought you probably would be able to come up with more examples. The point has been made though I believe.
How to tackle the issue then? The easiest way of course would be to learn the language, but often that will not be possible, especially if you’re checking out multiple countries. In that cases I would recommend that you just assure your employer about your willingness to learn the local language. Not much more you can do really.

Cultural References

Every region has different approaches to the same issues (as shown before). We have many stereotypes about different nationalities, but that’s just scratching the surface. To really know all the cultural references in a country you have to spend some time in it.
The problem here mainly concerns the designers, not so much the coders.
Advertisements very often target local references to get the point across. If you’re unfamiliar with those references then you can’t use them, simple as that.
You can claim that the existence of the issue is connected to the marketing goal of the company in question. Agencies which are creating advertisements for international viewing will of course rarely use references which are not well known. Those are usually bigger companies, if you manage to get into one of those right off the bat, consider yourself lucky (or just very good, possibly both).

Personal Beliefs

That may be a factor more often than you think and definitely more often then people will actually admit it.
What I’m referring to is the personal opinion of your employer regarding your country and its people. You might or might not get the job solely based on presumptions about you because of the perception of your country.
You can’t really do anything about it, it’s pretty much all in the hands of fate here. No one will openly admit their prejudices so all you can do is sit there and look trust worthy.
Again, if this even were to take place, chances are that it will happen in a small company. The people at the big ones usually have better stuff to do, then pull problems out of thin air.

The hassle

Finally, you might be sent through the door just because it would be to much of a problem for the employer to hire you.
The amount of issues regarding the employment of a foreign worker differ by area and we will not go into them in detail as it’s not necessary here.
Just be aware, that it may be factor, so try to come through, as a self sufficient person capable of handling your own problems.

Your advantages


All right, so we’ve looked at why we would not want to employ you. Let’s turn the tables.

Fresh approach

The same thing, that was your disadvantage is also your perk. Coming from a different place gives you a completely different perspective. That can be very helpful for both designers and coders. If your employer is open to improvement your input may just be the thing he’s looking for.
Variety between employees improves the quality of ideas coming out of brainstorming sessions. Also having knowledge of various areas can be the difference between landing or losing a client.

Having native representatives  for foreign clients

It’s a common practice, where a company in one country specializes in clients originating from a different country. If you’re lucky enough, it just may be your country.
If your employer is working for clients from across the border it benefits him in many ways, if he can show he employs some people from their own home land.
As we mentioned before – if you’re working on projects meant for your own country, you have the distinctive possibility of giving some input from your own culture.

Skill

Don’t forget though – your biggest advantage is you. The aforementioned advantages and shortcomings are but factors which can sway your fate one way or the other. The majority of the decision whether to employ you or not will be based on your capability. What we’re trying to do, is to improve your chances by pointing things out. Do not make them the main point of your approach, that one is about you.

Where and how to look?


So we’re all set. The last thing to do is to actually find the places to apply to.

Internet

Surprise, surprise. The Internet is, as always, your best friend. Figure out where you want to go and find out if there are any jobs there. Sounds simple enough, you can get there in a few ways though.
One of them is using job hunting websites like http://www.stepstone.com/ . In pretty much every country you will find some kind of an Internet board with jobs for the region. A complex list would be a topic for a whole new article, possibly for a different blog as well. For now, I’ll trust that you’re capable of asking uncle google for some job sites in the country of your choice.
That’s one way. Another, which I found even more effective, is actually using Google to look for advertising companies in a particular region. Not only do those often have sections on their websites for job seekers where you can find the address to send your documents, but you will sometimes see openings listed on their website as well. By applying through their website you show a bigger interest in the company.
You might as well want to send the applications as soon, as you can. At one point in life I was more interested in moving to a new place then where this place would be. So I’ve sent multiple applications through various countries using exactly the system I just described. Some companies even if they have no place for you now, will keep your documents for future possibilities. A few weeks ago I got an email from a company in New Zealand offering me a position for which I applied 16 months before. So you might want to make your availability known soon, some positions have a long waiting period.

Grab your Phone

It’s actually easier for people to tell you “no” by an e-mail than by phone. So if you want to increase your chances, instead of sending e-mails to the companies you find on the Internet, you can actually call them. Even if they tell you to send your information by e-mail, you’re already more then just an e-mail address. There’s a voice behind you and you’re “that guy who called”. Take any advantage you can get. Try to get the name of the person you spoke to, so that when you do email your documents, you can mention that you spoke with so and so.

Print out your stuff and knock

If it’s harder to tell you “no” by phone it’s even harder to do so in person. You might be worried here, that people will be annoyed if you just show up unannounced at their door asking for work. You can of course call first and ask for an appointment, but I can honestly say that I never got any kind of negative vibe from anyone I’ve visited unannounced. Once I even met the boss on his way to a meeting, but he still stopped for a minute to talk with me and look through my stuff (it happened in Maastricht, Netherlands – people there are generally very polite and friendly).
Again – even if they tell you to send your stuff by e-mail in the end, there is a voice and a face for them to remember. Be sure to carry copies of your CV to leave there as well. Without that you might as well not even go.

Good luck

That’s pretty much that. The rest is in your hands. Good luck out there, the worst thing you can do is nothing.

Mar 17, 2011

20+ Websites To Help You Learn Flash and ActionScript

There are many software products that are available in the market for website development. In the world of multimedia, Flash has its own position. In designing interactive demos, standalone movies, and aesthetically pleasing web content, flash plays a main role.
Tips and tricks can be learned from different websites.  The good reputation of Adobe products is one of the core reasons that Flash and ActionScript are so popular. A major reason for it’s popularity is that ActionScript is similar to JavaScript. There are many websites that are very helpful for learning Flash. Below are 25 websites that will help you in learning Flash/ActionScript.

20+ Websites To Help You Learn Flash and ActionScript

1. NET MAGAZINE


.NET mag has a very useful collection of tutorials on flash. These tutorial are helpful if you want to learn about styling in flash. Flash 7 gives you the advantage of embedding images regardless of the format. Flash 7 supports PNG, GIF and JPG etc as well as movie clips.  There are pdf files of tutorials available as well to view them offline.

2. STEVES TUTES


There are varieties of tutorials available on this website for Flash 8. This website provides learning materials about how to filter an image, about all the basic components of Flash 8 and many more. Video tutorials are also available on this site. To cut it short, this is a complete package for learning Flash 8.

3. BAYCON GROUP


Baycon Group’s tutorials are a good source for professional learning. The thing that I found best on this site is that it gives you different options for learning, it starts with the basics and proceeds towards professional learning. This website is very helpful for those who are interested in learning Flash 8 professionally.

4. TEACHER CLICK


On this site, the study material is divided in the form of syllabus. It is just like learning at any institute. The syllabus has 10 units which start from the easier parts of learning and gradually moves towards professional education. It also provides theoretical knowledge of Flash 8. If someone is interested in getting practical as well as theoretical information about Flash 8, I recommend this site.

5. BRAINBELL


This tutorial is a great source of learning for the layman; anyone can learn Flash 8 from this tutorial. This set of  tutorials provides a step by step learning of Flash 8 by demonstrating how to perform simple tasks on Flash 8. This tutorial is a good way of getting a start on Flash 8. An amateur can get everything about Flash 8 on this site.

6. MACROMEDIA FLASH TUTORIALS


This is a good source of learning for how to create a mouse cursor, Flash preloaders and others aspects. If you are dealing with multimedia,  Flash 8 will be your first choice. These tutorials are helpful for those who are working professionally and are in need of assistance in grooming their work. This site will help them in putting a step forward in their career. It has guidance about animation, special effects, and games and about all that a professional wants.

7. MACROMEDIA FLASH NAVIGATION TUTORIALS


Tutorialized provides nearly 600 tutorials for Flash animation. There are varieties of instructional materials that demonstrate animation on different objects. This is good for those who need help in their work. It has tutorials for animations, interior design, creating transparent buttons, highlighting, 3D animation, vector animation and much more.

8. NEW TUTORIALS


There is another website that provides tutorials for preloaders in Flash along with many other tutorials. This site is helpful for those who are interested in making interactive software programs like games and animations.

9. ADOBE


The most genuine site for learning Flash is Adobe.com. Here you can find Flash MX tutorials where you can get information about how to work around ActionScript. The website gives a good approach for those who want an authentic piece of information.

10. FLASH TUTORIALS.US


If you need ActionScript or Macromedia then Flashtutorials is a site that provides you tutorials that gives you theoretical information about how to apply logics and functions using ActionScript.

11. WEB DESIGN-TUTORIALS


If you are up to developing an exotic website and you need some tutorials, webdesign-tutorials will be a good choice. It has many tutorials which will help you design a website of any kind and any taste. Layout design tutorials, background integration tutorials and interactivity tutorial will be very helpful amongst all. There are many tutorials that will also help you in developing websites to meet the demands of today’s fashion like breaking news interface, flash flip letter effect etc.

12. WEB DEVELOPERS NOTES


Flash tutorials are available for developers and hobbyists in webdevelopersnotes.com. These tutorials teach how to enhance interactivity in a web design as well as software design. In multimedia little things matter a lot to include interactivity and appeal to the design. There are many tutorials that give you innovative ideas and the good news is that they are available on this site.

13. FLASH ADVISOR


Flash Advisor is another site for those who are interested in learning projectile motion, sound controlling and animated preloaders in Flash. The tutorials on this site are of high quality. These lessons are good for advance learning of Flash. The best thing about these tutorials is that they have been written by experts. This is a dedicated site for Flash.

14. SMASHING MAGAZINE


This is a site where I found some interesting tutorials that will help you create some smashing, eye-catching, and aesthetic web designs. The tutorials here will teach you how to increase reusability in Flash although it is assumed to be a nightmare for many programmers. Picture animation, water wave effect, high-tech animation, hypnotic gear rotation are some tutorials that I found most helpful.

15. EDUCATION ONLINE FOR COMPUTERS


This site has a good collection of Flash tutorials, not only for advance learning, but also for novices. Flash is the best source to create multimedia content on the web sites and games and the tutorials available on this site will teach you how to achieve it in Flash. You can find all kinds of tutorials from simple drawing guidance to high level animation courses.

16. FLASH GAME DESIGN


I will recommend this site to those who are interested in designing games. As its name suggests, this is web site where one can find tutorial related to designing websites and games and creating animations. These are advanced tutorials by which you can learn how to create web designs without using advanced ActionScript.
There are endless possibilities of developing any kind of master piece by using flash; the only limit is your mind. Banner, videos, cartoons, games and web sites can be developed with aesthetically pleasing designs in flash. Following are some websites for those who are interested in designing of banners.

17. FLASH-BANNER-CREATOR


The main idea of this site is banner creation using Flash. The tutorials on this site are all about different techniques of creating banners. Anyone who is interested in creating banners has to download the tutorial from this site. The steps used in the tutorial are very simple, one just need to follow the steps.

18. LAYOUT GALAXY


I found a concise and appropriate tutorial for banner creation in Flash here. This tutorial follows a step by step description of processes involved in the creation of banners in flash.  You can learn how to create exquisite and appealing banners for websites here.

19. FLASH VAULT


Here I found another tutorial for flash banners. This is helpful for people who want to create a full flash banner. The steps in the tutorial will lead you to create a high quality banner.

20. TIZAG


Tizag.com has many Flash tutorials from introduction to email forms. This site provides a good collection of flash tutorials for those who are eager to learn flash from home.

21. GOTO AND PLAY


Flash games are very famous these days and every developers are trying to learn the development of these games because of increasing demands from players. Gotoandplay.it is the place where you can find everything that you want to develop games.


22. EMANUELE FERONATO


If you want to learn flash game development in detail, then this tutorial is for you. It is a very long and detailed tutorial about game development. This tutorial demonstrates how you can create a quality game in Flash using ActionScript. This tutorial has covered a vast area of game development and that is why it is divided into parts which makes it a complete guide.

23. FLASH PERFECTION


All the tutorials on Flash Perfection are related to software that can be developed using Flash. This site covers many areas of development. It is also a complete package for flash game enthusiasts.
When it comes to multimedia, Flash is a household name. In games, websites, or banners you can add as much interactivity as you want using flash. The present era demands interactivity that’s aesthetically pleasing and user friendly. Today’s world is all about media and entertainment. If you want to utilize this powerful technology, I am sure that this article will help you save time in finding tutorials. Just find the best tutorial for you and start enjoying Flash miracles.

Convert Burnstudio from PSD to HTML [Very Detailed]


In this article you will learn how to convert Personal Website from PSD to HTML in a detailed step-by-step tutorial. You will learn how to create this layout by using a CSS framework, some CSS styles and JavaScript. When you’ve completed this tutorial you’ll have a valid HTML/CSS, cross browser compatible and dynamic layout. I hope that you can go through this tutorial and learn a few techniques that will help you in future projects.
Convert Burnstudio from PSD to HTML [Very Detailed]
Now, let’s get started with this tutorial.
Links you will need to complete this tutorial:
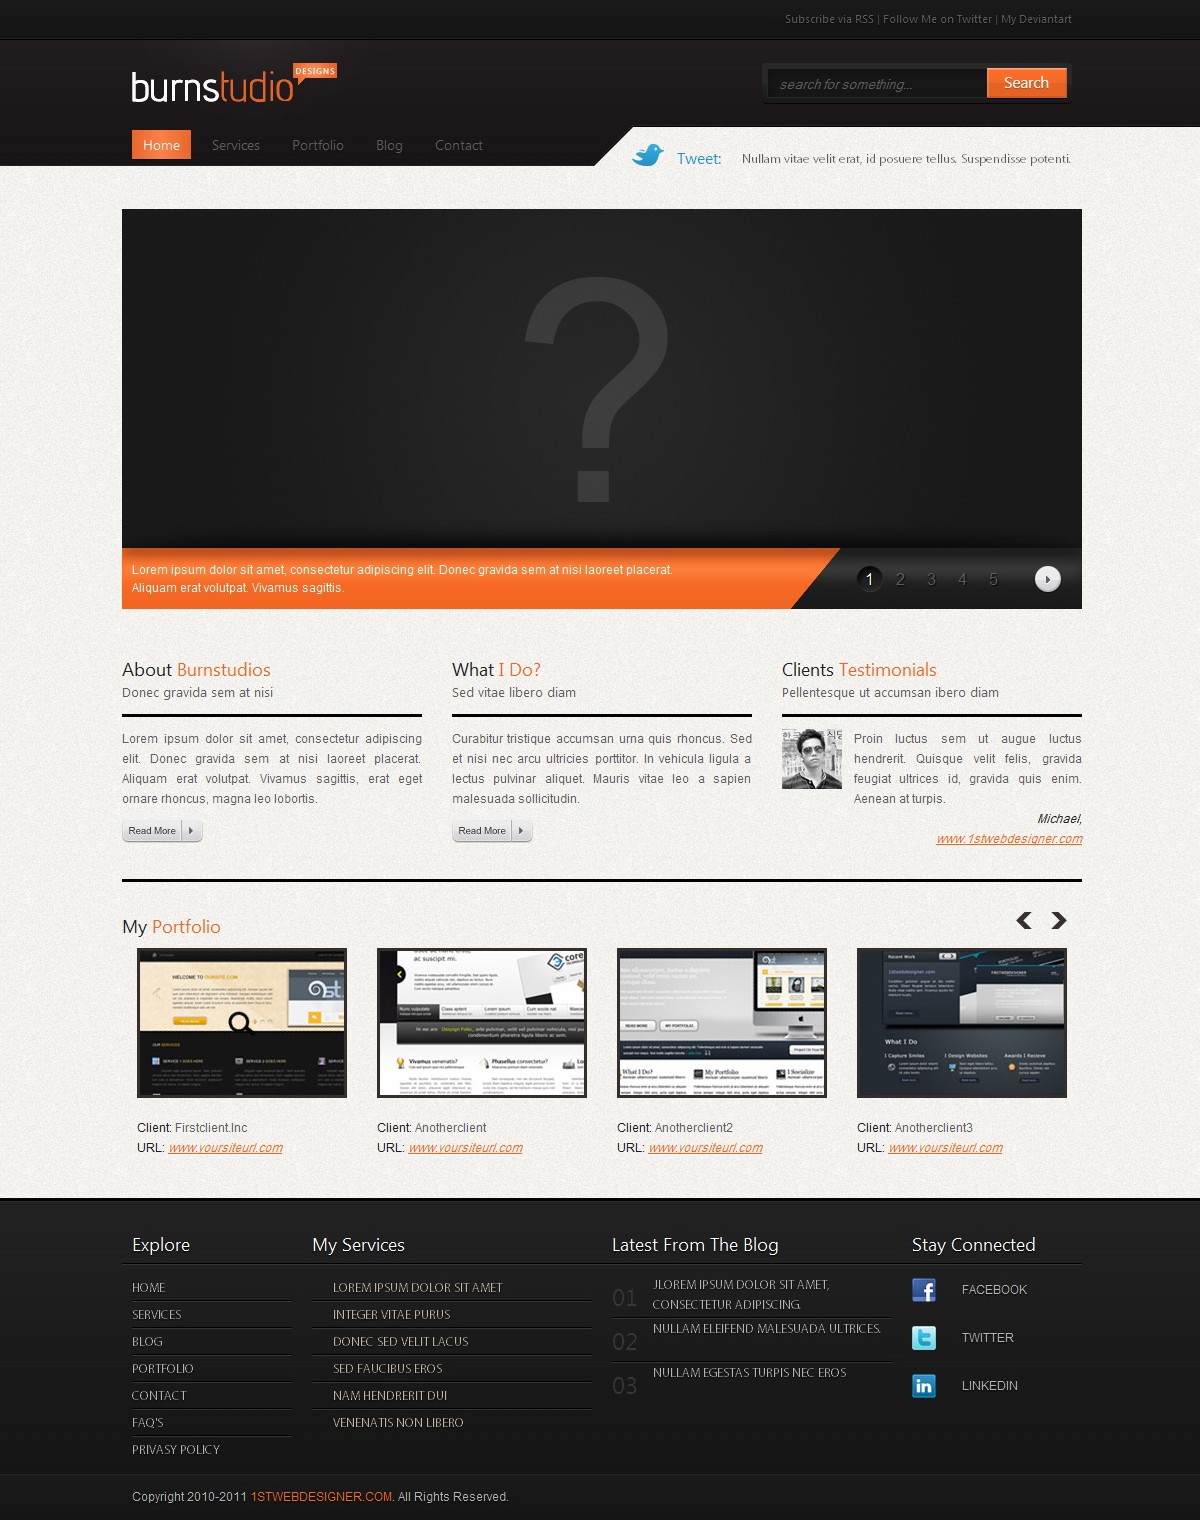
Here’s what we’ll be creating (Click on image to view a full working demo).
You can also download this tutorial’s source files here.

Step 1 – Preparation

If you read the Photoshop tutorial for creating this landing page you probably noticed that 960gs grid system was used to create guidelines. Well, in this tutorial we will also need the 960gs CSS framework. Using CSS frameworks makes layout and style creation a lot easier and saves time in web development. Now you should download the 960 Grid system source files for usage in this tutorial.
You will also need a code editor; you can use a plain text editor such as Notepad. I always recommend you use a free code editor and get used to it, this helps you get things done faster.
During this tutorial you should test your layout in different browsers, you don’t want to return to the beginning because of browser compatibility issues. In this tutorial I am using some CSS3 styles, but as you might know, not all browsers support CSS3 features. The CSS3 styles used in this tutorial have been tested with Firefox version 3.6.

Step 2 – Getting Your Files Ready

The first thing you should do is create a directory for your website. I usually create an /images/ directory for images and a /styles/ directory which will hold every style sheet (CSS) file and the slider JavaScript file. The HTML file goes in the root directory.
Now you need to grab the CSS files from the 960gs grid system we downloaded earlier, extract the ZIP file and then copy the CSS files from /code/css/ folder to your /styles/ directory, you should copy 960.css, reset.css and text.css files. You should notice a directory called /uncompressed/ which has the same files but in a bigger and more readable format, I recommend using the compressed CSS files. You also need to create a new file in your root directory called index.html and create another file called style.css in /styles/ directory.
In this tutorial we need to export images from Photoshop to use in our HTML layout. You can export these images yourself if you have the layered PSD file from the original Photoshop tutorial, or you can just grab the source files with this tutorial and you’ll find the images I created.

Step 3 – Simple Starter Layout

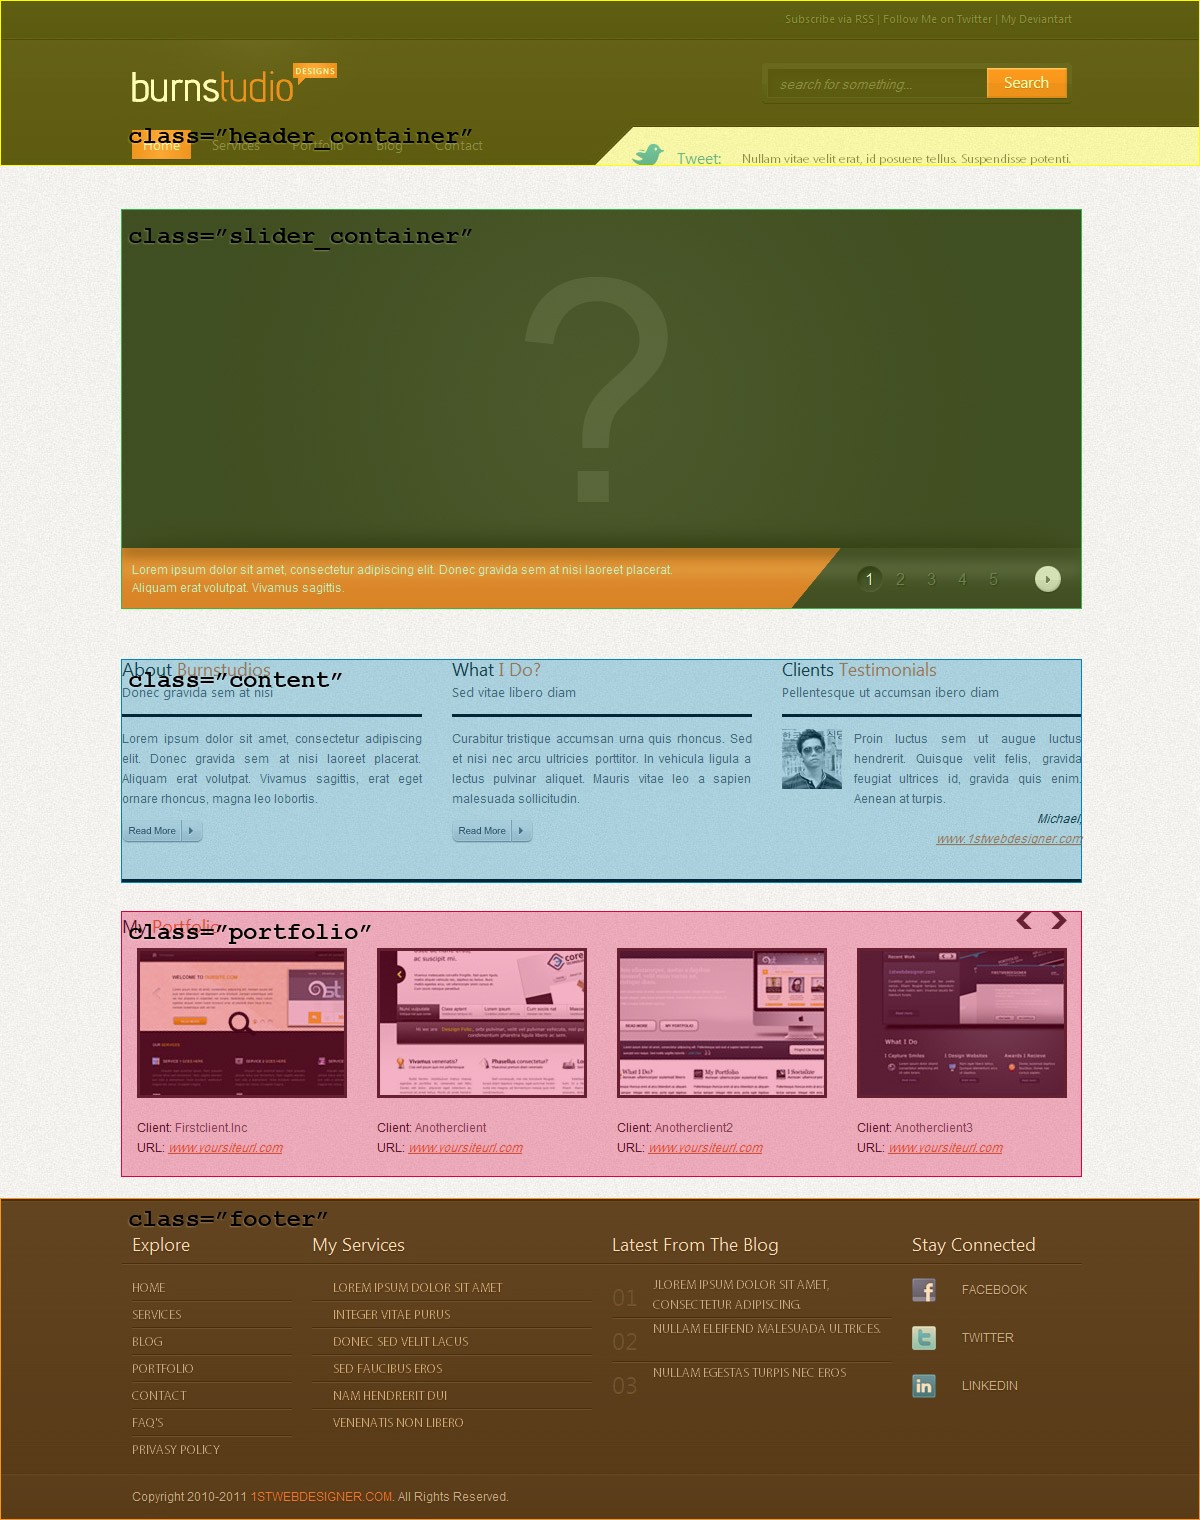
We need to start by creating a Simple HTML layout as the basis of our site to be. By looking at the Photoshop Layout you should notice a few things:
  1. The body has a background image that repeats horizontally and vertically.
  2. The layout has a header section which contains the logo, main menu, search box and latest tweets.
  3. The layout has a two sliders one is the content slider which could be used to display featured items and a portfolio slider which displays portfolio items.
  4. There’s a content section which contains about, what I do and client testimonials sections.
  5. Finally, we have a footer section which will contain footer links, services, latest posts from the blog, social icons and copyright text.
You can follow the notes above by looking at this image.
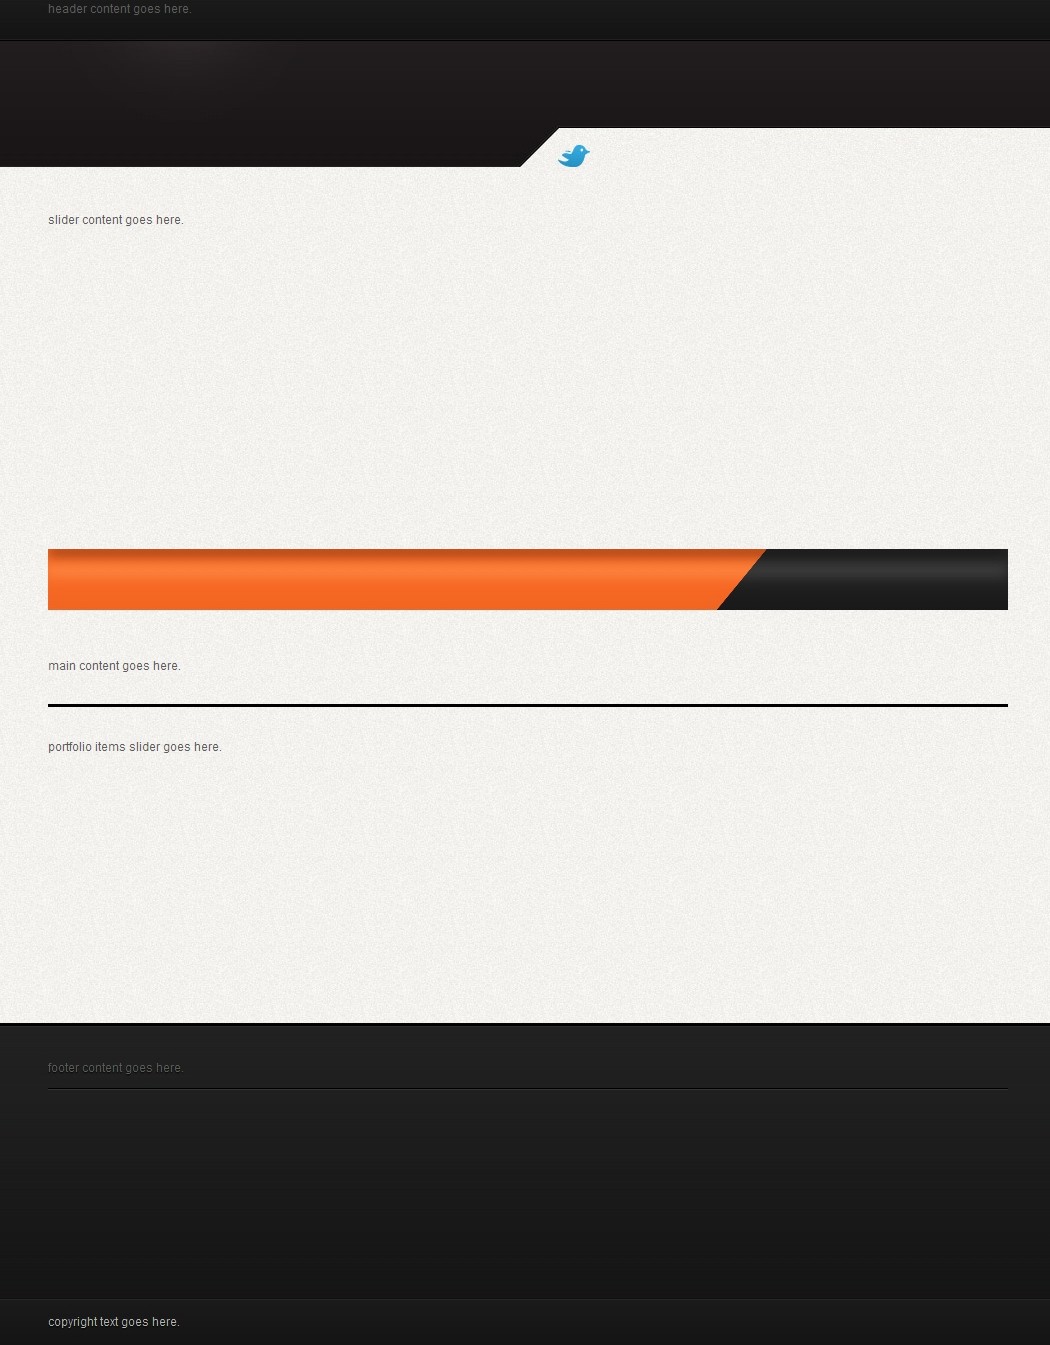
Now, Based on these notes we create the following HTML layout.
1DOCTYPE html PUBLIC "-//W3C//DTD XHTML 1.0 Transitional//EN" "http://www.w3.org/TR/xhtml1/DTD/xhtml1-transitional.dtd">
3
4    "Content-Type" content="text/html; charset=UTF-8" />
5    class="hiddenSpellError" pre="">BurnStudio Designs
6    css" href="styles/reset.css" rel="stylesheet" media="all" />
7    css" href="styles/text.css" rel="stylesheet" media="all" />
8    "text/css" href="styles/960.css" rel="stylesheet" media="all" />
9    "text/css" href="styles/style.css" rel="stylesheet" media="all" />
10
11
12    
class="header_container">
13        
class="container_16">
14            header content goes here.
15        
16    
17    
class="slider_container">
18        slider content goes here.
19    
20    
class="container_12 content">
21        main content goes here.
22    
23    
class="portfolio">
24        portfolio items slider goes here.
25    
26    
class="footer">
27        
class="container_16">
28            footer content goes here.
29        
30        
class="container_16 copyrights">
31            copyright text goes here.
32        
33    
34
35
Notice that I added five divisions for the sections we mentioned above each with a unique class name so we can style it later. The “header_container” has a division inside it with class “container_16″ which is already styled in 960.css file (which supports 16 columns) and we added this division inside it because we want the header section to occupy the full width of the browser and “container_16″ is limited to a width of 960px. This is also used in the footer division as well. The content division has an additional class “container_12″ (which supports 12 columns) and in this we want the style of “container_12″ to be applied to the content container.Now let’s add the CSS as follows (all CSS should be added in style.css file):
1body {
2    color: #5d5d5d;
3    background: #fff url(../images/bg.jpg) repeat;
4    font-family: Arial;
5    font-size: 12px;
6}
7
8a, a:link, a:visited {
9    color: #f36622;
10    outline: none 0;
11}
12
13h2 {
14    font-family: Segoe UI;
15    font-size: 18px;
16    font-weight: normal;
17    color: #202020;
18    padding: 0 0 12px 0;
19    margin: 0 0 12px 0;
20    border-bottom: 3px solid #000;
21}
22
23    h2 span.highlight {
24        color: #f36622;
25    }
26
27    h2 span.sub_title {
28        font-size: 13px;
29        color: #5d5d5d;
30    }
31
32.header_container {
33    width: 100%;
34    height: 168px;
35    background: #000 url(../images/header_bg.jpg) no-repeat top center;
36    overflow: hidden;
37}
38
39.slider_container {
40    position: relative;
41    height: 400px;
42    width: 960px;
43    margin: 0 auto;
44    margin-top: 43px;
45    background: url(../images/slide_bg.jpg) no-repeat bottom center;
46    overflow: hidden;
47}
48
49.content {
50    margin-top: 46px;
51    border-bottom: 3px solid #000;
52    padding: 0 0 30px 0;
53}
54
55.portfolio {
56    height: 286px;
57    width: 960px;
58    margin: 0 auto;
59    margin-top: 30px;
60    overflow: hidden;
61    position: relative;
62}
63
64.footer {
65    width: 100%;
66    height: 287px;
67    padding: 35px 0 0 0;
68    background: url(../images/footer_bg.jpg) repeat-x;
69    overflow: hidden;
70    text-shadow: 0px 1px 1px #000000;
71    filter: dropshadow(color=#000000, offx=0, offy=1);
72}
73
74    .footer .container_16 {
75        height: 240px;
76        overflow: hidden;
77        background: url(../images/footer_seperator.jpg) repeat-x;
78        background-position: 0px 30px;
79    }
80
81    .footer .copyrights {
82        height: 47px;
83        line-height: 47px;
84        background: transparent;
85        color: #b5b5b5;
86    }
In the above CSS we styled the body with text color, font family and size, and a background image repeating horizontally and vertically with a white background color. Next, I set links color to #f36622 with no outline. Then I styled h2 with font family, font size, font weight to normal, text color, a bottom margin and padding of 12px and a bottom border. Now I added the style for header 2 highlight and subtitle with text color and font size. Next, I styled the “header_container” with full-page width, a fixed height, a centered none repeating background image with black background color and hidden overflow. The “slider_container” style is set with position relative which will be useful when we go later and add the slider script, a fixed height and width, margin set to “0 auto” which will make the division center horizontally in the page, a hidden overflow, a top margin for the space between the slider and the header and a non-repeating background image. Next, I styled the “content” with top margin to make space between the content and the slider, a bottom border and a bottom padding. The “portfolio” style is set with fixed height and width, a margin set to “0 auto” which will make the division center horizontally in the page, a fixed top margin, a hidden overflow and a relative position which will be useful when we go later and add the slider script.
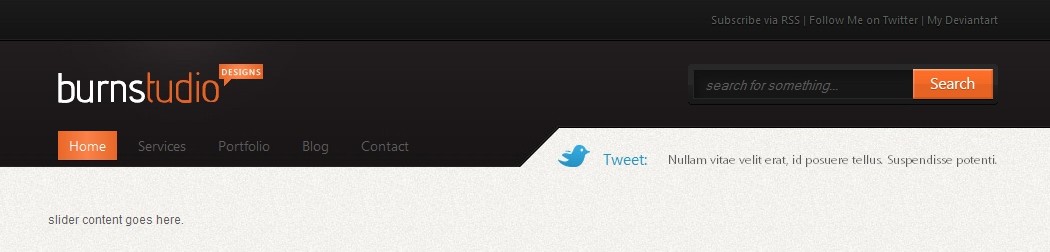
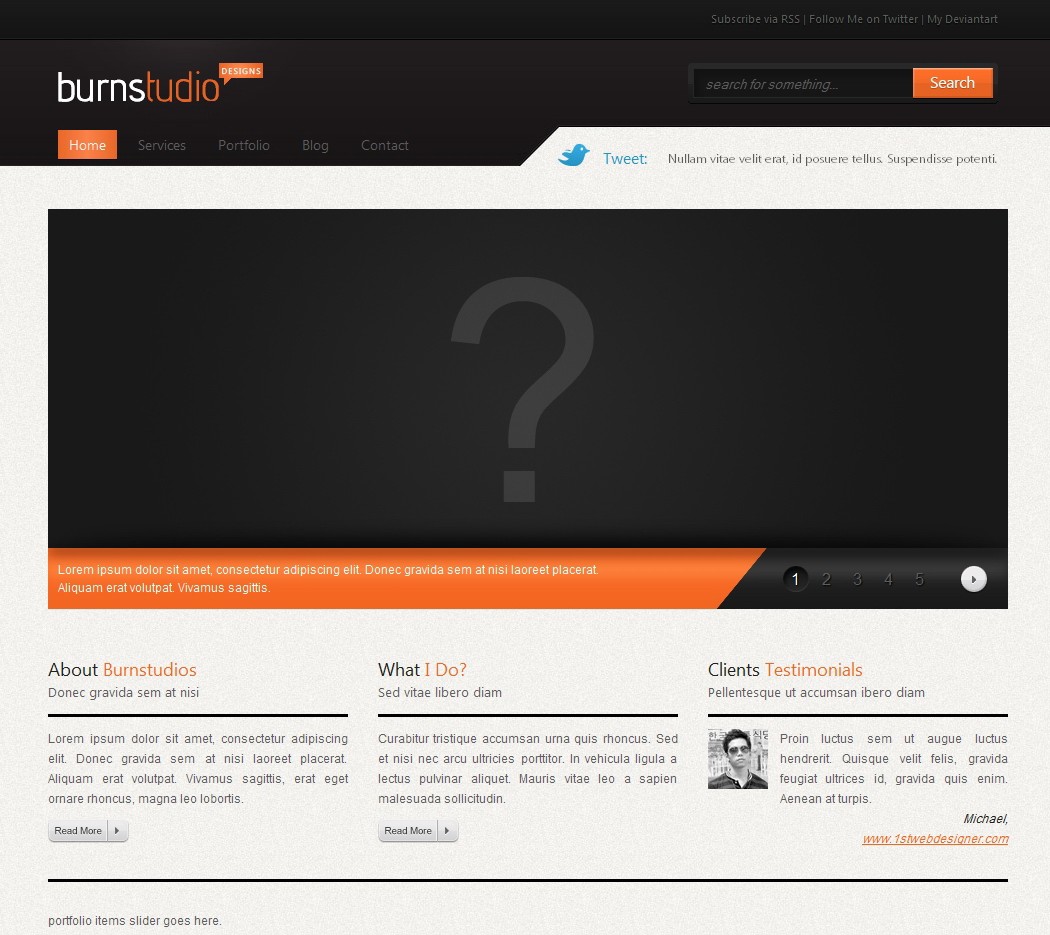
Finally, the footer has a style with full-page width, a fixed height, a top padding, a horizontally repeating background image, hidden overflow and a text shadow which is a CSS3 feature. The “container_16″ inside the footer has a fixed height with hidden overflow, a horizontally repeating background image which will act as a divider between footer headers and content with a vertical background position of 30px. the “copyrights” division style is set to a fixed height and an equal value of line height to align text vertically to center, a transparent background and a text color of #b5b5b5. The result should be the same as the image below.

Step 4 – Adding Content to Header

Now we need to add the logo, menu items, search text box and latest tweets. Here’s the HTML for the header section.
1
class="header_container">
2    
class="container_16">
3        
class="grid_16 top_header">
5            |
7            |
8            "#" title="My Deviantart">My Deviantart
9        
10        
class="grid_10 logo">
12        
13        
class="grid_6 search">
14            
class="search_fields">
15                "text" value="search for something..." />
16                "submit" value="Search" />
17            
18        
19        
class="grid_8 main_menu">
20            "#" title="Home" class="active">Home
21            "#" title="Services">Services
22            "#" title="Portfolio">Portfolio
23            "#" title="Blog">Blog
24            "#" title="Contact">Contact
25        
26        
class="grid_8 tweets">
27            Tweet:
28            Nullam vitae velit erat, id posuere tellus. Suspendisse potenti.
29            Nullam vitae velit erat, id posuere tellus. Suspendisse potenti.
30        
31    
32
I added a division with class “grid_16 top_header” to hold all the links in the top header, then I added a division with class “grid_10 logo” for the logo text contained inside an h1 and a link and a division with class “grid_6 search” to complete the 16 columns and to hold the search text field and submit button. Next, I added a division with class “grid_8 main_menu” to hold the menu items as links with the home link having a class “active”. Finally, I added a division with class “grid_8 tweets” for the latest tweets. Now lets add the CSS for the header content.
1.header_container .top_header {
2    height: 41px;
3    text-align: right;
4    font-family: Segoe UI;
5    font-size: 11px;
6    line-height: 41px;
7    text-shadow: 0px 1px 1px #000000;
8    filter: dropshadow(color=#000000, offx=0, offy=1);
9}
10
11    .header_container .top_header a {
12        text-decoration: none;
13        color: #5d5d5d;
14    }
15
16        .header_container .top_header a:hover {
17            color: #6f6f6f;
18        }
19
20.header_container .logo, .header_container .search {
21    height: 86px;
22}
23
24    .header_container .logo h1, .header_container .logo h1 a {
25        display: block;
26        width: 205px;
27        height: 40px;
28        background: url(../images/burnstudio_sprite.png) no-repeat;
29        background-position: 0px 0px;
30        text-indent: -10000px;
31        margin: 24px 0 0 0;
32    }
33
34    .header_container .search .search_fields {
35        background: url(../images/burnstudio_sprite.png) no-repeat;
36        background-position: 0px -80px;
37        width: 310px;
38        height: 41px;
39        margin: 24px 0 0 0;
40        font-family: Segoe UI;
41        float: right;
42    }
43
44        .header_container .search .search_fields input[type=text] {
45            float: left;
46            width: 200px;
47            height: 29px;
48            line-height: 29px;
49            padding: 6px 9px 6px 16px;
50            background: transparent;
51            border: 0px none;
52            font-style: italic;
53            color: #5d5d5d;
54        }
55
56        .header_container .search .search_fields input[type=submit] {
57            float: left;
58            width: 80px;
59            height: 31px;
60            padding: 0px;
61            background: transparent;
62            border: 0px none;
63            text-indent: -10000px;
64            cursor: pointer;
65            margin: 5px 0 0 0;
66        }
67
68.header_container .main_menu, .header_container .tweets {
69    height: 41px;
70}
71
72    .header_container .main_menu a {
73        float: left;
74        height: 29px;
75        line-height: 29px;
76        color: #5d5d5d;
77        font-family: Segoe UI;
78        font-size: 14px;
79        text-decoration: none;
80        padding: 0 11px;
81        margin: 5px 10px 0 0;
82    }
83
84        .header_container .main_menu a:hover, .header_container .main_menu a.active {
85            color: #fff;
86            -webkit-box-shadow: 0px 1px 0px #060506;
87            -moz-box-shadow: 0px 1px 0px #060506;
88            box-shadow: 0px 1px 0px #060506;
89
90            background: #E96728; /* old browsers */
91            background: -moz-linear-gradient(left, #E96728 0%, #FB824A 50%, #E96728 100%); /* firefox */
92            background: -webkit-gradient(linear, left top, right top, color-stop(0%,#E96728), color-stop(50%,#FB824A), color-stop(100%,#E96728)); /* webkit */
93            filter: progid:DXImageTransform.Microsoft.gradient( startColorstr='#E96728', endColorstr='#E96728',GradientType=1 ); /* ie */
94        }
95
96.header_container .tweets {
97    text-align: right;
98    line-height: 65px;
99    font-family: Myriad Pro;
100    font-size: 13px;
101}
102
103    .header_container .tweets span {
104        display: block;
105        float: left;
106        color: #2792c3;
107        font-family: Segoe UI;
108        font-size: 16px;
109        margin: 0 0 0 65px;
110    }
The top header division is styled with a fixed height, text alignment to right, a font family and font size, a line height equal to height to center text vertically and a text shadow. Then I styled the top header links both the normal and hover states with text color and no decoration. The logo and search divisions are styled with fixed height. The logo header and link style is set with block display, a fixed height and width, a background image for the logo which is included inside the CSS sprites image and I use background position to show the part I want, a negative text indent of 10000px to make text hidden when viewed in browsers and a top margin of 24px.
Next, I styled the “search_fields” division holding the search text box and submit button with a background image and background position from the CSS sprites image, a fixed height and width, a top margin, a font family and floating to right. The search text field has a left floating with fixed height and width, a line height equal to height to center text vertically, a padding, background set to transparent, no border, a text color and font style set to italic. The search submit button styled with left floating, a fixed height and width, zero padding, transparent background, no border, a negative text indent of 10000px to hide text when viewed in browser, cursor set to pointer and a top margin to position the button correctly. The main menu and tweets division is styled with fixed height.
Now, the main menu links normal state style is set with left floating, a fixed height and an equal line height, text color, a font family and font size, no text decoration, a left and right padding and no top or bottom padding and a top and right margin to make space between menu items. The hover and active state of menu items has a different text color, a box shadow and a gradient background which are both CSS3 features.
Finally, the tweets division is styled to align text to right with a suitable line height, font family and size. The span inside the tweets section style is set with left floating, a block display, a suitable text color, font family and size, and a left margin to position the span correctly. The result should be as the image below.

Step 5 – Adding Slider content, Style and Javascript

Now, we are going to add the slider and for this I am going to use an already implemented script, which is Slidesjs. I modified the script to make it suit our layout and now here’s the HTML for the slider content.
1
"slides">
2    
class="slides_container">
3        
4            "images/slide.jpg" alt="" />
5            
6            class="description">Lorem ipsum dolor sit amet, consectetur adipiscing elit. Donec
7                gravida sem at nisi laoreet placerat.
8
9                Aliquam erat volutpat. Vivamus sagittis.
10        
11        
12            "images/slide.jpg" alt="" />
13            class="description">Lorem ipsum dolor sit amet, consectetur adipiscing elit. Donec
14                gravida sem at nisi laoreet placerat.
15
16                Aliquam erat volutpat. Vivamus sagittis.
17        
18        
19            "images/slide.jpg" alt="" />
20            class="description">Lorem ipsum dolor sit amet, consectetur adipiscing elit. Donec
21                gravida sem at nisi laoreet placerat.
22
23                Aliquam erat volutpat. Vivamus sagittis.
24        
25        
26            "images/slide.jpg" alt="" />
27            class="description">Lorem ipsum dolor sit amet, consectetur adipiscing elit. Donec
28                gravida sem at nisi laoreet placerat.
29
30                Aliquam erat volutpat. Vivamus sagittis.
31        
32        
33            "images/slide.jpg" alt="" />
34            class="description">Lorem ipsum dolor sit amet, consectetur adipiscing elit. Donec
35                gravida sem at nisi laoreet placerat.
36
37                Aliquam erat volutpat. Vivamus sagittis.
38        
39    
40
The “slider_container” has two divisions inside it a division with ID “slides” for the script to use and a division with class “slides_container” which will hold all the slides that are represented by a division with the slide content inside it, in this case an image and text contained inside a span element with class “description”. Now let’s add the CSS style for the slider content and script.
1.slider_container .slides_container {
2    width: 960px;
3    display: none;
4}
5
6.slider_container .slides_container div {
7    width: 960px;
8    height: 400px;
9    display: block;
10    overflow: hidden;
11}
12
13    .slider_container .slides_container div span.description {
14        color: #fff;
15        display: block;
16        width: 555px;
17        margin: -3px 0 0 10px;
18        padding: 15px 0 0 0;
19        overflow: hidden;
20    }
21
22.slider_container .pagination {
23    list-style: none;
24    margin: 0;
25    padding: 0;
26    height: 61px;
27    position: absolute;
28    top: 339px;
29    right: 70px;
30    z-index: 100;
31}
32
33    .slider_container .pagination li {
34        float: left;
35        height: 26px;
36        width: 26px;
37        margin: 18px 5px 0 0;
38        text-align: center;
39    }
40
41        .slider_container .pagination li a {
42            display: block;
43            line-height: 26px;
44            color: #5d5d5d;
45            text-decoration: none;
46            font-size: 16px;
47            text-shadow: 1px 1px 1px #000000;
48            filter: dropshadow(color=#000000, offx=1, offy=1);
49        }
50
51        .slider_container .pagination .current a, .slider_container .pagination li a:hover {
52            color: #fff;
53            background: url(../images/burnstudio_sprite.png) no-repeat;
54            background-position: 0px -50px;
55        }
56
57.slider_container a.next {
58    position: absolute;
59    right: 20px;
60    top: 357px;
61    z-index: 100;
62    display: block;
63    height: 28px;
64    width: 28px;
65    text-indent: -10000px;
66    background: url(../images/burnstudio_sprite.png) no-repeat;
67    background-position: -35px -50px;
68}
69
70.slider_container a.prev {
71    display: none;
72}
The slides container has a fixed width with display set to none. Each slide division style is set with fixed height and width, a block display and hidden overflow. The description inside each slide is set with white text color, a fixed width, a negative top margin for correct positioning, a left margin for spacing, a top padding and overflow content hidden.
Now, the slider pagination style which is auto generated by the JavaScript is set to be positioned absolutely which will be absolute to the containing relatively positioned element, a top and right values to correctly position it with a z-index value of 100 which acts as a layer value making the pagination on top of other default elements that has a default z-index value of auto and works only on positioned elements. The pagination list element is styled to float to left, fixed height and width and text aligned to the center.
The style of normal state of the link inside each list element is set to display like a block, a line height equal to list element height to center text vertically, a custom text color with no text decoration, a fixed font size and a black text shadow. The hover and current state of the link style is set to have a white text color with a background image and background position to show the part we want from the CSS Sprites image.
Finally, the next and previous elements is styled which is also generated by the JavaScript. I hid the previous link with display none, and styled the next link with a background image with a part from the sprites image set by background position, an absolute position, a top and right values to position link correctly, a z-index of 100, a fixed width and height and a negative text indent to hide the text in browsers.
Now let’s add the required jQuery script in the header. You can find the script file in this tutorial source file or from the jQuery Scrollable script page. The HTML head section should be like this (which will be also used by the portfolio elements slider).
1
2    "Content-Type" content="text/html; charset=UTF-8" />
3    BurnStudio Designs
4    "text/css" href="styles/reset.css" rel="stylesheet" media="all" />
5    "text/css" href="styles/text.css" rel="stylesheet" media="all" />
6    "text/css" href="styles/960.css" rel="stylesheet" media="all" />
7    "text/css" href="styles/style.css" rel="stylesheet" media="all" />
8    
9    
10
Finally, we need to add the JavaScript code that will allow the slider to work on our layout. You should add this script just before the closing tag of the body. Here’s the JavaScript.
1
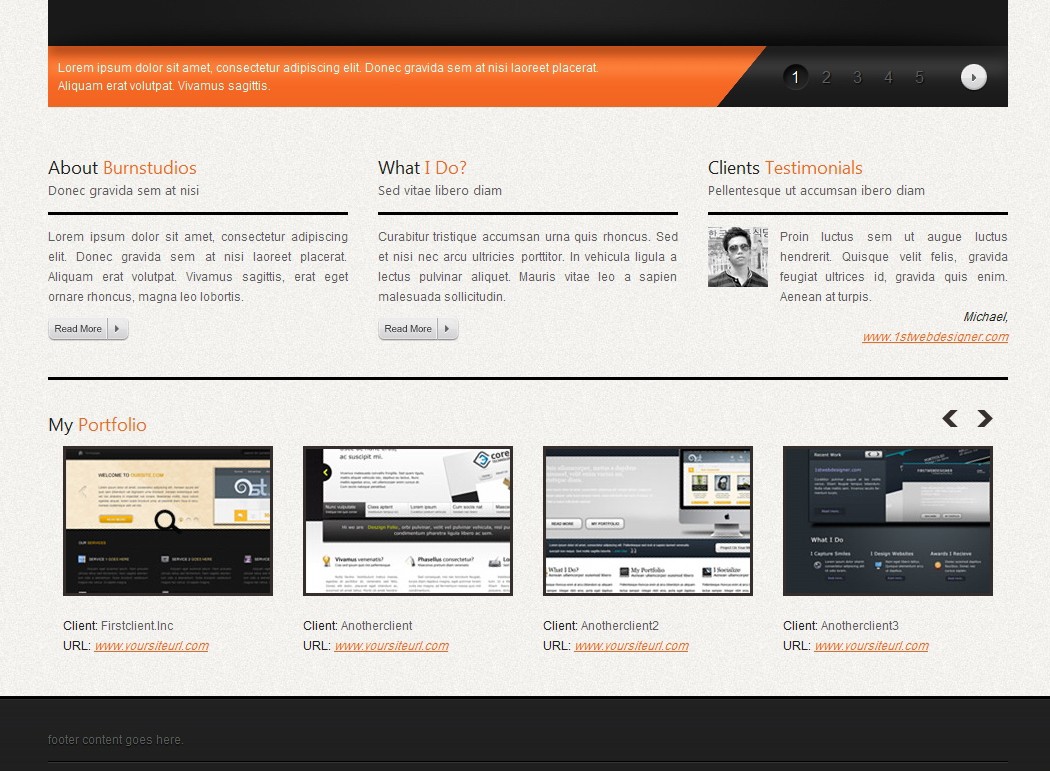
Now our layout should look like this.

Step 6 – Adding Main Content and Style

Now let’s add the content for “About Burnstudio”, “What I do?” and “Client Testimonials”, here’s the HTML.
1
class="container_12 content">
2    
class="grid_4 about">
3        

About class="highlight">Burnstudios

4        class="sub_title">Donec gravida sem at nisi
5        
6            Lorem ipsum dolor sit amet, consectetur adipiscing elit. Donec gravida sem at nisi laoreet placerat. Aliquam erat volutpat. Vivamus sagittis, erat eget ornare rhoncus, magna leo lobortis.
7        
9    
10    
class="grid_4 what">
11        

What class="highlight">I Do?

12        class="sub_title">Sed vitae libero diam
13        
14            Curabitur tristique accumsan urna quis rhoncus. Sed et nisi nec arcu ultricies porttitor. In vehicula ligula a lectus pulvinar aliquet. Mauris vitae leo a sapien malesuada sollicitudin.
15        
17    
18    
class="grid_4 testimonials">
19        

Clients class="highlight">Testimonials

20        class="sub_title">Pellentesque ut accumsan ibero diam
21        
22            "images/image.jpg" alt="" />
23            Proin luctus sem ut augue luctus hendrerit. Quisque velit felis, gravida feugiat ultrices id, gravida quis enim. Aenean at turpis.
24            
25            
26                Michael,
27                "#">www.1stwebdesigner.com
28            
29        
30    
31    
class="clear">
32
Notice that the content section contains three divisions with class “grid_4″ and another unique class name for each division. Each division has an

title with two spans inside one for the highlighted text and one for the sub-title text, a paragraph and a read more link with the exception of the last division which has an image and a link inside the paragraph. Then we have a division with class “clear” and it is used to clear floated elements and make the parent container expand to its content. Now let’s add the CSS style for the content.
1.content .about {
2    margin-left: 0px;
3    margin-right: 30px;
4}
5
6.content .what {
7    margin-left: 0px;
8    margin-right: 30px;
9}
10
11.content .testimonials {
12    margin-left: 0px;
13    margin-right: 0px;
14}
15
16    .content .grid_4 p {
17        text-align: justify;
18        margin: 0 0 10px 0;
19        line-height: 20px;
20    }
21
22        .content .grid_4 p img {
23            float: left;
24            margin: 0 12px 12px 0;
25        }
26
27        .content .grid_4 p span {
28            float: right;
29            font-style: italic;
30            color: #202020;
31            text-align: right;
32        }
33
34    .content .grid_4 a.readmore {
35        width: 81px;
36        height: 24px;
37        display: block;
38        background: url(../images/burnstudio_sprite.png) no-repeat;
39        background-position: -225px 0px;
40        text-indent: -10000px;
41    }
I started by styling the “.about”, “.what” and “.testimonials” classes with zero left margin and a 30px right margin with the testimonials set to zero left and right margins. Now, I styled the paragraph inside each “grid_4″ division with justified text alignment, a bottom margin and a line height of 20px. The image inside the paragraph is styled with left floating and a right and bottom margin to make space between image and text. The span inside the paragraph used in the testimonials text is styled to be italic, float and text aligned to right with a custom color. Finally, the read more link is styled with a background image from the CSS sprites image, a fixed height and width, display set to block and a negative text indent of 10000px to hide text in browsers. Now our layout should look like this.

Step 7 – Adding Portfolio Items, Style and Script

Now let’s add the portfolio items. Here’s the HTML.
1
class="portfolio">
2    

3        My class="highlight">Portfolio
4    
"portfolio_slides">
5        
class="slides_container">
6            
7                
class="item">
8                    "images/portfolio_1.jpg" alt="" />
9                    
10                    Client: Firstclient.Inc
11                    
12                    URL: "#">www.yoursiteurl.com
13                
14                
class="item">
15                    "images/portfolio_2.jpg" alt="" />
16                    
17                    Client: Anotherclient
18                    
19                    URL: "#">www.yoursiteurl.com
20                
21                
class="item">
22                    "images/portfolio_3.jpg" alt="" />
23                    
24                    Client: Anotherclient2
25                    
26                    URL: "#">www.yoursiteurl.com
27                
28                
class="item">
29                    "images/portfolio_4.jpg" alt="" />
30                    
31                    Client: Anotherclient3
32                    
33                    URL: "#">www.yoursiteurl.com
34                
35            
36            
37                
class="item">
38                    "images/portfolio_1.jpg" alt="" />
39                    
40                    Client: Firstclient.Inc
41                    
42                    URL: "#">www.yoursiteurl.com
43                
44                
class="item">
45                    "images/portfolio_2.jpg" alt="" />
46                    
47                    Client: Anotherclient
48                    
49                    URL: "#">www.yoursiteurl.com
50                
51                
class="item">
52                    "images/portfolio_3.jpg" alt="" />
53                    
54                    Client: Anotherclient2
55                    
56                    URL: "#">www.yoursiteurl.com
57                
58                
class="item">
59                    "images/portfolio_4.jpg" alt="" />
60                    
61                    Client: Anotherclient3
62                    
63                    URL: "#">www.yoursiteurl.com
64                
65            
66        
67    
68
The portfolio items slider is the similar in construction as the content slider we used earlier with a few things changed, the ID used is “portfolio_slides” which must be a unique identifier so that we can use in the JavaScript. The division that holds each slide contains four divisions with class “item” each with an image some text and links. Now let’s add the CSS style for the portfolio items.
1.portfolio h2 {
2    position: absolute;
3    top: 0px;
4    left: 0px;
5    border: 0 none;
6    padding: 0;
7    margin: 0;
8}
9
10.portfolio .slides_container {
11    width: 960px;
12    display: none;
13}
14
15    .portfolio .slides_container div {
16        width: 960px;
17        height: 286px;
18        display: block;
19        overflow: hidden;
20    }
21
22    .portfolio .slides_container div.item {
23        float: left;
24        width: 210px;
25        height: 250px;
26        margin: 0 15px;
27        margin-top: 36px;
28        line-height: 20px;
29        overflow: hidden;
30    }
31
32        .portfolio .slides_container div.item img {
33            border: 3px solid #352e2c;
34            margin: 0 0 20px 0;
35        }
36
37            .portfolio .slides_container div.item span {
38                color: #202020;
39            }
40
41        .portfolio .slides_container div.item a {
42            font-style: italic;
43        }
44
45.portfolio a.next {
46    position: absolute;
47    right: 15px;
48    top: 0px;
49    z-index: 100;
50    display: block;
51    height: 17px;
52    width: 16px;
53    text-indent: -10000px;
54    background: url(../images/burnstudio_sprite.png) no-repeat;
55    background-position: -90px -50px;
56}
57
58.portfolio a.prev {
59    position: absolute;
60    right: 50px;
61    top: 0px;
62    z-index: 100;
63    display: block;
64    height: 17px;
65    width: 16px;
66    text-indent: -10000px;
67    background: url(../images/burnstudio_sprite.png) no-repeat;
68    background-position: -70px -50px;
69}
Notice that the header is styled with absolute position so that we can place it any where we want in its container which in this case a zero top and left values, zero border, zero padding and margins. the slides container style is the same as the one in the content slider we implemented above. The division that represents a slide is styled with a fixed height and width and hidden overflow. Now, we style each portfolio item with floating to left, fixed height and width, left and right margins of 15px, a top margin of 36px, a fixed line height and hidden overflow. The image inside each item has a 3px border with a bottom margin. The span has a different color and the links is set to italic. Finally, I added the style for the next and previous links with almost similar styles, different only in right position and background position.
Now we need to make the slider work by adding the JavaScript, we added just after the next script we added above for the content slider. The script block should be like this.
1
Now our layout should look like this.

Step 8 – Adding Footer Content and Style

Now let’s add the content for the footer, here’s the HTML for the footer.
1
class="container_16">
2    
class="grid_3 explore">
3        

4            Explore
5        
    6            


  • class="first-child">"#" title="Home">Home

  • 7            


  • "#" title="Services">Services

  • 8            


  • "#" title="Blog">Blog

  • 9            


  • "#" title="Portfolio">Portfolio

  • 10            


  • "#" title="Contact">Contact

  • 11            


  • "#" title="Faq's">Faq's

  • 12
    13    


  • class="last-child">"href="#">Privasy Policy">Privasy Policy

  • 14        
    15    
    16    
    class="grid_5 services">
    17        

    18            My Services
    19        
      20
      21    


    • class="first-child">Lorem ipsum dolor sit amet

    • 22            


    • Integer vitae purus

    • 23
      24    


    • Donec sed velit lacus

    • 25
      26    


    • Sed faucibus eros

    • 27
      28    


    • Nam hendrerit dui

    • 29
      30    


    • class="last-child">venenatis non libero

    • 31        
      32    
      33    
      class="grid_5 blog">
      34        

      35            Latest From The Blog
      36        class="first-child">
      37            01 JLorem ipsum dolor sit amet, consectetur adipiscing.
      38        
      39        
      40            02 Nullam eleifend malesuada ultrices.
      41        
      42        class="last-child">
      43            03 Nullam egestas turpis nec eros
      44        
      45    
      46    
      class="grid_3 social">
      47        

      48            Stay Connected
      50        "#" title="Linkedin">Linkedin
      51    
      52
      53
      class="container_16 copyrights">
      54    
      class="grid_16">
      55        Copyright 2010-2011 "http://www.1stwebdesigner.com" title="1stwebdesigner.com">
      56            1stwebdesigner.com. All Rights Reserved.
      57    
      58
      The footer contains four divisions with class names that accumulates to 16 grid each one has an

      tag. The first one has an unordered list with links, notice that the first and the last items has a unique class name for later styling. The next one has an unordered list with first and last items having a unique classes. The blog division has paragraphs with the first and last one having a unique classes. The last division has the social links. Finally, the copyrights division has some copyright text with a link inside a “grid_16″ division. Now let’s add the CSS style for the footer content.
      1.footer a {
      2    text-decoration: none;
      3    text-transform: uppercase;
      4}
      5
      6.footer h3 {
      7    color: #fff;
      8    font-family: Segoe UI;
      9    font-size: 18px;
      10    font-weight: normal;
      11    line-height: 22px;
      12}
      13
      14.footer .first-child {
      15    border-top: 0px none;
      16}
      17
      18.footer .last-child {
      19    border-bottom: 0px none;
      20}
      21
      22.footer p {
      23    font-family: Myriad Pro;
      24    font-size: 13px;
      25    text-transform: uppercase;
      26    color: #b5b5b5;
      27    height: 42px;
      28    border-top: 1px solid #353535;
      29    border-bottom: 1px solid #000;
      30    margin: 0;
      31}
      32
      33    .footer p span {
      34        font-family: Segoe UI;
      35        font-size: 24px;
      36        color: #373737;
      37        text-shadow: 0px 0px 0px #000000;
      38        filter: dropshadow(color=#000000, offx=0, offy=0);
      39        float: left;
      40        line-height: 42px;
      41        margin: 0 15px 0 0;
      42    }
      43
      44    .footer ul {
      45        margin: 0;
      46    }
      47
      48        .footer ul li {
      49            list-style: none;
      50            margin: 0px;
      51            font-family: Myriad Pro;
      52            font-size: 13px;
      53            text-transform: uppercase;
      54            line-height: 25px;
      55            border-top: 1px solid #353535;
      56            border-bottom: 1px solid #000;
      57        }
      58
      59            .footer ul li a {
      60                color: #b5b4b4;
      61                display: block;
      62            }
      63
      64            .footer ul li a:hover {
      65                color: #d7d5d5;
      66            }
      67
      68        .footer .services ul li {
      69            color: #c3b7a4;
      70            padding: 0 0 0 21px;
      71        }
      72
      73    .footer .social a {
      74        display: block;
      75        color: #b5b5b5;
      76        padding: 0 0 0 50px;
      77        margin: 0 0 18px 0;
      78        height: 30px;
      79        line-height: 30px;
      80    }
      81
      82        .footer .social a:hover {
      83            color: #d7d5d5;
      84        }
      85
      86        .footer .social a[title=Facebook] {
      87            background: url(../images/facebook.png) no-repeat left center;
      88        }
      89
      90        .footer .social a[title=Twitter] {
      91            background: url(../images/twitter.png) no-repeat left center;
      92        }
      93
      94        .footer .social a[title=Linkedin] {
      95            background: url(../images/linkedin.png) no-repeat left center;
      96        }
      I started by styling the links with no text decoration and text transform set to uppercase. Then I styled header 3 with white text color, font family and size, normal font weight and fixed line height. Notice that I styled the general “.first-child” class with zero top border and the general “.last-child” with zero bottom border, although this can be done with CSS3 but it will not work on Internet Explorer 7 or 8 versions. The paragraph is styled with font family and size, uppercase text, a custom color, a fixed height, a top and bottom border with different colors and zero margins.
      The span inside the paragraphs is has a different font family and size, different color, has no text shadow, a floating to the left, a line height equal to paragraphs height to center the text vertically and a right margin. Now the unordered list has zero margins, the list items is styled with no list style, zero margins, custom font family and size, uppercase text, a fixed line height, and a top and bottom border with different colors. The links inside list elements has different color and block display, with a hover different hover state text color. The services list item color is changed to #c3b7a4 with a bottom padding.
      Finally, the social links is styled with block display, custom text color, a bottom padding to make space for the background image, a bottom margin for space between links and an equal height and line height values to center text vertically. Now, each social link is styled according to its title text with a convenient background image as an icon.
      If you followed this tutorial correctly then you should have a full working HTML/CSS layout from a PSD that looks exactly like this.

      Conclusion

      So that’s it. In this tutorial you learned how to convert a layout from PSD to a fully working HTML/CSS website, don’t forget to validate and check for browser compatibility (the layout will not validate because of JavaScript & CSS3 styles, remove both to validate properly). If there is a part of this tutorial you didn’t understand, or you have a better technique, feel free to share with everyone by commenting below