Oct 20, 2017

how to use Angular CLI to create a new project and deploy it

I want to show you how to use Angular CLI to create a new project and deploy it even if you've never used Angular before.
To install Angular CLI, just run the following command:

    $ npm install -g @angular/cli
Once it's installed you'll be able to run it from the command line using the ngcommand. When you do, you'll see a lot of output, but if you scroll back, you should be able to see the following:

    $ ng --version
If everything installed correctly, you should see the current version output to your terminal. Congratulations!
Now that we have Angular CLI and its dependencies installed, let's use this tool to create our first application.
Open up the terminal and run the ng new command to create a new project from scratch:

    $ ng new angular-hello-world
Once you run it, you'll see the following output:

    installing
      create .editorconfig
      create README.md
      create src/app/app.component.css
      create src/app/app.component.html
      create src/app/app.component.spec.ts
      create src/app/app.component.ts
      create src/app/app.module.ts
      create src/assets/.gitkeep
      create src/environments/environment.prod.ts
      create src/environments/environment.ts
      create src/favicon.ico
      create src/index.html
      create src/main.ts
      create src/polyfills.ts
      create src/styles.css
      create src/test.ts
      create src/tsconfig.json
      create .angular-cli.json
      create e2e/app.e2e-spec.ts
      create e2e/app.po.ts
      create e2e/tsconfig.json
      create .gitignore
      create karma.conf.js
      create package.json
      create protractor.conf.js
      create tslint.json
    Successfully initialized git.
    Installing packages for tooling via npm.
    Installed packages for tooling via npm.
Note: the exact files that your project generates may vary slightly depending on the version of @angular/cli that was installed.
This will run for a while while it's installing npm dependencies. Once it finishes we'll see a success message:

    Project 'angular-hello-world' successfully
created.
There are a lot of files generated! Don't worry about understanding all of them yet. We explain every file here throughout the book. Through the chapters there we'll walk through what each one means and what it's used for.
For now, let's just run the app and then deploy it

Running the App

To run the app, type the following:

  $ cd angular-hello-world
  $ ./node_modules/.bin/ng serve
Then wait a minute and you should see:

  ** NG Live Development Server is running on http://localhost:4200 **
  ...
  webpack: Compiled successfully.
This means your first Angular app is running! You can view it in your browser by opening http://localhost:4200.
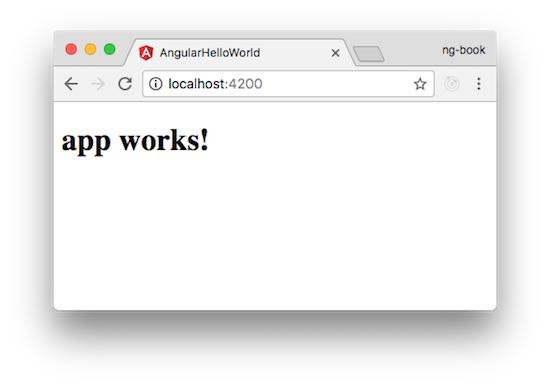
Viewing your app on localhost
Viewing our App on Localhost
What's happening here is that Angular CLI has compiled our code and started a development server on our machine. Now, let's take this code and put it on the internet where everyone can see.

Deploying the App

Deploying our app is the act of pushing our code to a server, where it can be accessed by others.
Broadly speaking, the idea is that we're going to:
  • compile all of our TypeScript code into JavaScript (which the browser can read)
  • bundle all of our JavaScript code files into one or two files
  • and then upload our JavaScript, HTML, CSS, and images to a server
Ultimately, this Angular app is an HTML file that loads JavaScript code. So we need to upload our code to a computer somewhere on the internet.
So first, we build our Angular app:

./node_modules/.bin/ng build --target=production --base-href '/'
This command tells the ng tool to build our application for a productionenvironment. We also set the --base-href to a single slash /.
This command will run for a little while and when it finishes you should have a distfolder on your disk.

$ ls dist/
favicon.ico
index.html
inline.95a6cb571dbc2cfcb6a0.bundle.js
main.91fb0238219cb9a1d089.bundle.js
polyfills.5aae015f16e5b66f61e9.bundle.js
styles.d41d8cd98f00b204e980.bundle.css
vendor.4efaf64fc64d0c1e3642.bundle.js
These files are the full compiled result of your app. Notice that there is a long string of characters in the middle of each file such as:

main.91fb0238219cb9a1d089.bundle.js
Those characters are a hash of the content (and may not match on your computer). If you look at each file, you can see that we have some icons, the index.html, a main.js, a polyfills.js, a vendor.js, and some styles.css.
Now all the need to do is upload these to our server.

Uploading to a Server

There are lots of ways to host your HTML and JavaScript. For this demo, we're going to use the easiest way possible: now.
If you don't want to use now, you're free to use whatever method you want. For instance, you can host sites on Heroku, AWS S3, upload files to your own server via FTP, etc.
The important thing is that the server exposes all of the files in our distfolder onto the internet.

Installing now

We can install now using npm:

npm install -g now
To deploy a site with now is very easy:

cd dist # change into the dist folder
now
The now command should ask you a couple of questions (such as your email address) and you'll need to check your email and click the link inside.
After you've confirmed your account (or if you had one already), now will upload your code and then give you a URL to view to see your application.
Visit that URL and view your app. If it works, try sending the URL to a friend!
Viewing your app on now
Viewing our App on The Internet
Congratulations! You've built and deployed your first Angular app!
Of course, there is a lot more to learn, but at least now we know that whatever we build can be deployed live online!
Next time, we'll chat a bit more about how Angular uses components to structure apps.

Oct 16, 2017

Angular 4 – Tutorial from scratch


Hello everyone, Angular,  as you may already know is one of the powerful and popular JavaScript frameworks. There are currently 3 versions of Angular, in which Angular 4 is the latest. Angular 2, the second version, was completely rewritten to provide more flexibility and more ease in development, then AngularJS, the first version. Angular 4 is the update to the Angular 2 and has the backward compatibility support. Angular is used to create SPA which stands for Single Page Application. The SPA helps in smooth user experience as the page gets loaded at one time only and routing is also done on the same page removing the page to reload.
So, this is the quick brief about the Angular framework, as the Angular 4 is the latest, there are very few tutorials on the internet, most of them are not complete or paid. So, I thought of writing a complete tutorial for Angular 4 and will be trying to cover all the features of Angular 4.  To start with Angular 4, knowledge of AngularJs or Angular 2 is not required at all. It will be helpful if you some experience with HTML, CSS and JavaScript. Also though the Angular 4 uses TypeScript, it is not required to learn TypeScript, JavaScript knowledge will be enough.

Getting Started

With Angular 2, Angular CLI was introduced which stands for Angular Command Line Interface. Angular CLI runs on node JS and helps in the quick creation of the new Angular application. To start creating an application first we need to install Angular CLI and for that, we need to have Node js. To install Node js click on the link  https://nodejs.org/en/download/current/ and install for your platform. After installing Node js open the command terminal, as I m using windows so I’ll open a command prompt. To install Angular CLI type
npm install -g @angular/cliwhere npm stands for Node Package Manager, -g for global to use it globally in the system. To check if Angular CLI is installed properly you can use command
ng –versionto check the version.

Creating Angular 4 Application

Now we can start creating our Angular 4 application. To create a new project, we will be using Angular CLI and will type the command
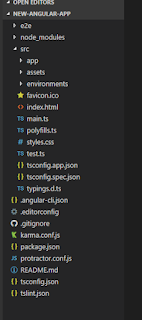
ng new new-angular-appThis command will create the default structure and files with needed for the development of the project. It will take some time to download the files. After it is completed you will have a configured Angular 4 project. Now let’s see the structure and files inside the folder. I ‘ll be using the Microsoft Visual Studio Code IDE for my development as its free and powerful. Let see the created directories and files for our new angular app.
Inside the root directory, you’ll see 3 folders, e2e which is an end to end testing which we ‘ll be using later. The second one is the node_modules folder which contains the angular files and other required classes for development. We don’t have to do anything in this folder. The last one is the src or the source folder which contains the development files and index.html.
We have some other files which we may not require as default configuration is sufficient for running the application. We ‘ll be doing our development inside the src folder only. In this app, the folder contains the components. Images and other media files can be stored in assets  folder. Environment variables configurations are in the environment folder which as of now we don’t need to change. Out of the other files, we will be using, index.html (rarely) for few imports of style libraries, style.css for application level styling and favicon.ico to change the favicon. Others we can leave to default.

 Inside the app folder except for app.module.ts  all other files will be there for every new component we create. In Angular we can create different components for a different purpose and include it using the selector, we will get in detail later. Every component as app.component.css, which contains styling instructions, app.component.html, which contains the HTML code for that component, app.component.ts, which acts like and controller class and all the javascript code related to events and functionalities are written in this file. For component level unit testing app.component.ts, is there. During development, we will be using various dependencies for Angular libraries which need to imported and added to app.module.tsfile.
This was about the structure of Angular 4 files, now lets start and check the app is working or not. Angular CLI provides a server which we can start and check the output in the browser. To start that go inside the application folder in command prompt and type ng serve this will compile and deploy the app on the local server, which can be accessed through http://localhost:4200 (to change port number ng serve –port_no ). So let’s start the app and see if it is working fine.
Application compiled successfully. Let’s see the output.
As you can see the default page, means the app server is working fine. In the next tutorial, we will start development of a cool and reactive app using Angular 4 and Angular Material. Before that let’s understand some basics of Angular 4

Angular 4 new features and improvements

The Angular team has just released Angular 4. This is a major release which has some breaking changes!
Angular 4 new features
Angular 4 is backward compatible with Angular 2!
Angular 4 logo
Here are some great features and improvements:

Faster and smaller

Angular 4 is now faster and smaller!

View engine now has less code

Angular team introduces a new view engine system, which can reduce the size of generated code for our components by around 60%!

Animation has been moved out to a separated package

Angular animation package will not be in your production code anymore. You can still import and use it whenever you want.

ngIf now has a new else statement

Now you can use else statement with ngIf.
<div *ngIf="activated; else hidden">

</div>
<ng-template #hidden>Your hidden code</ng-template>

Angular Universal

You can now render an Angular app on the server using Angular Universal.

Upgrading to Angular 4

If you're using Angular 2, upgrading to Angular 4 is very easy. You just need to run these commands:
For Mac users:
npm install @angular/{common,compiler,compiler-cli,core,forms,http,platform-browser,platform-browser-dynamic,platform-server,router,animations}@latest typescript@latest --save 
For Windows users:
npm install @angular/common@latest @angular/compiler@latest @angular/compiler-cli@latest @angular/core@latest @angular/forms@latest @angular/http@latest @angular/platform-browser@latest @angular/platform-browser-dynamic@latest @angular/platform-server@latest @angular/router@latest @angular/animations@latest typescript@latest --save
You can view more features and the release note at:

Get the Angular 4 book for free!

Because Angular is using semantic versioning for Angular releases, Angular 4 is actually an improved version of Angular 2!
If you know Angular 2, you'll know how to use Angular 4!

Sep 7, 2017

9 Best Heatmap Tools and Plugins for Your WordPress Site

Do you wish that you had better insights into how your users interact with your website? Heatmap tools and plugins can help you visualize where users click, how far they scroll, and how they really use your site. In this article, we will show 9 Best heatmap tools and plugins for your WordPress site.
Heatmap Tools and Plugins

What is Heatmap?

A Heatmap allows you to visualize how visitors use your website. Heatmap tools provide an overlay on top of your pages showing areas with more activity as hotter than the areas with low user activity.
Heatmap tools offer visual analytics about which areas your users click, look, and scroll. This information helps you understand usability issues with your website and optimize it for better conversions and user experience.
These tools are different than other analytics tools like Google Analytics. Traditional analytics tools provide you information like how users came to your site, what pages they view, and how they move from one page to another.
Heatmaps analytics tools tell you how users actually use and interact with your site design.
Having said that, here are the best heatmap tools and plugins for your WordPress site.

1. Crazy Egg

CrazyEgg
Crazy Egg is probably the most popular heatmap tool available in the market today. It offers click heatmaps, mouse cursor heatmaps, and scroll heatmaps. It offers another useful feature called confetti heatmap.
Confetti heatmap by Crazy Egg allows you to divide the heatmap data into traffic sources. This means you can see how users from social networks, search, or other sources interact with your website.
Crazy Egg is extremely easy to add into a WordPress website. They even have a plugin that makes installation a breeze.
The pricing for Crazy Egg starts from $9/ month for 10,000 visitors and 10 active pages. Their most popular plan is called Plus, which offers 100,000 visits, 50 active pages, and hourly reports for $49/month. All plans come with one-month free trial.
Unlike other heatmap tools, Crazy Egg does not limit your usage to per site, this means you can use the same account on multiple websites.

2. Mouseflow

Mouseflow
Mouseflow is another easy to use heatmap tool for WordPress users. Mouseflow offers click heatmaps, scroll heatmaps, movement heatmap, and attention heatmap.
It also offers recording of website visitor activity. This means you can look at a user interacting with your site. Another useful feature offered by Mouseflow is form analytics, which allows you to see why users are abandoning your forms.
Mouseflow also allows you to track funnels. You can also set custom funnels so that you can see how users from different traffic sources behave differently on your site.
Pricing for Mouseflow starts at $19/month for 1,000 recorded sessions limited to 1 website. Prices increase with more recorded sessions and websites you add to your plan. Mouseflow also offers a free plan limited to 100 recorded sessions for a single site.

3. Lucky Orange

Lucky Orange
Lucky Orange is another popular choice in heatmap analytics. They offer heatmap tracking for clicks, movement, and scroll depth. Apart from that, they also offer session recording and traffic segmentation.
It also comes with forms analytics, conversion funnels, visitor polls, and a live chat software that you can add to your website. The list of feature covers almost everything that you would want from a heatmap tool.
The pricing for Lucky Orange starts from $10 / month for 25,000 page views on single site.

4. Inspectlet

Inspectlet
Inspectlet is a very powerful session recording and heatmap service. It covers all three types of heatmap tracking: clicks, cursor movement, and scrolling.
They also offer conversion funnel analytics with very powerful filtering feature. There is a robust tagging filter, which you can use to tag individual users. This way you can see how they interact on returning visits. Inspectlet also provides form analytics to understand and optimize your lead generation.
Pricing for Inspectlet starts from $39 per month with 5000 recorded sessions limited to 1 site. They also offer a free plan limited to 100 recorded sessions for a single site.

5. Heatmap.me

Heatmap.me
Heatmap.me claims to be one of the simplest to use heatmap analytics tool in the market. It is easy to install and comes with a very small JavaScript code that loads asynchronously without slowing down your website.
Unlike some tools in this list, Heatmap.me offers real time heatmaps. You can see how users are interacting with your site live. It also respects privacy of your users by not logging unnecessary data.
Heatmap.me offers a free plan limited to 5 pages on 1 site. Their paid plans start with $100 per month for unlimited pages on a single site.

6. Ptengine

Ptengine
Ptengine provides heatmap and web analytics tool packed into one. It offers click, conversion tracking, scroll and attention heatmaps. They also offer A/B testing between two heatmaps, which is a useful feature for designers testing different interfaces.
Their web analytics features include device segmentation, campaign performance, one click filters, and page analysis.
Pricing at Ptengine starts from $7 per month for 1 site, 5 heatmaps, and 25K pageviews. They also offer a free plan with 1 heatmap on a single site limited to 1000 pageviews.

7. Clicktale

Clicktale
Clicktale is another popular choice for heatmaps analytics. They offer a very powerful session recording technology and great in-depth heatmaps analysis features. But he biggest advantage is that they offer integrations with other analytics tools that you may already be using, like Google Analytics, Optimizely, Google Tag Manager, etc.
Clicktale has heatmaps, session recording, conversion analytics, advanced analytics, etc.
Clicktale does not have pricing information listed on their website. Instead, you will have to contact their sales teams to request a demo and then discuss the pricing.

8. SeeVolution

SeeVolution
SeeVolution offers a very easy to use way to include heatmaps on a WordPress site. They have plugins for all popular CMS, including WordPress. Apart from easy installation, they also offer a very clean and nice dashboard that helps users understand the data they are seeing.
Heatmaps by SeeVolution include clicks, scrolling, mouse interactions and movement heatmaps. They also include site wide analytics to give you an overview of your site’s performance.
SeeVolution offers a free plan for 1000 visits limited to 1 site. Their paid plans start from $79 per month for 2 domains. They also offer 14 day free trial on all their plans.

9. Hotjar

Hotjar
Hotjar is powerful suite of apps bundled into one analytics and conversion optimization tool. It combines heatmaps, session recordings, funnels, form analytics, polls & surveys, and a recruiter tool to get testers.
They offer click, tap, scroll, and mouse movement heatmaps. With session recording and conversion funnels you can discover and fix usability issues on your site. Hotar’s reporting dashboard is intuitive and easy to use.
Their pricing plans start from $29 per month for 10,000 page views and snapshot size of 2,000 visits for heatmaps, forms and recordings. They also offer a limited free plan, which you can use to try it out.

Aug 16, 2017

21 (Mostly) Free Web Usability Tools You Can’t Do Without

What’s web usability and as a marketer, why should you care?
Content marketing and social media ROI may be the foundation of your marketing practice, but if your site has usability errors, no one will ever get to find out how great you are.
When it comes to web usability the acknowledged guru—a term that’s probably justified in this case—is Jakob Neilsen, who has been writing about the topic since the early days of the web. His Neilsen Norman group has dozens of useful articles on web usability.
Web Usability Tools You Can't Do Without
In a nutshell, usability is about the user experience (UX)—how easy it is for people to use your site and accomplish their goals while there.
According to Neilsen, usability includes learnability, efficiency, memorability, errors and satisfaction. (And check out another short introduction to the topic in section three of our article on website bounce rates.)
If you want your target customers to keep coming back for more, to see your site as a valuable resource and to share your content widely, then addressing usability is a no-brainer. Here’s a roundup of some free tools to help you identify usability issues so you can solve them.

Page Speed

One of the important aspects of usability is page load speed. According to KISSmetricsresearch, people can leave your site fast if a page takes more than 3 or 4 seconds to load.
GTmetrix
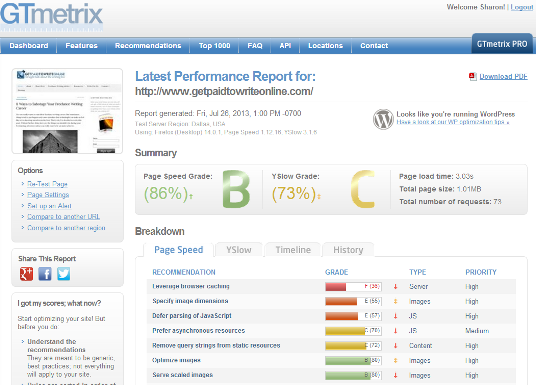
1. GTMetrix is a free tool that assesses the causes of site slowdown. You can do an instant test, or create an account (you have to keep it active by using it once a month) and add a number of pages for regular monthly reports. This is a good way to drill down into what aspects of your site’s code aren’t working, as it easily identifies script, CSS and image errors.
2 & 3. Google’s Page Speed Tools allow you to analyze and optimize the speed of your website, and you can check out the site speed reports in Google Webmaster Tools for more insight.
4. Pingdom‘s online URL analyzer tests page load time and finds bottlenecks that you can eliminate to speed up your site.
Find more speed testing tools in this list from SixRevisions.

Design and Navigation

Site visitors will find it hard to find your excellent content unless the design and navigation help them. One way to test site navigation is with card sorting apps, which allow testers to play around with navigation menus and categories for a website, grouping these in a way that makes sense to them.
5. I’ll be honest; I’ve never used one, but if that’s what you need, check out the card sorting service from UXPunk. As long as you use it with only 10 participants the free trial is permanent.
6. UXPunk also has a similar service for testing web navigation and application menus, with 25 responses in the free plan.
spur screenshot
7. Spur wraps up a number of ways of testing your design into one neat web app. Enter your URL in the box, wait a while and you get a snapshot of your page with a number of buttons so you can check out whether your design still works in greyscale, high contrast, if it’s blurred and at different zoom levels.

User Interaction

How are site visitors interacting with your site? Where do they look and click? Understand this and you will know how to change your site and improve the user experience. There are a number of tools that help with this.
8. Want to know what areas of your web page are getting most attention? That’s our specialty here at Crazy Egg (get your 30-day free trial here), but if you want a free version, then check out ClickHeat from Labs Media. You’ll need to be technically inclined as you have to download and install it to the server yourself.
9. For click tracking, check out Clickdensity. This tool has been around for a while and offers three ways of visualizing visitor interaction through click maps, heat maps and hover maps. You can use the free trial version for ever as long as you only want to track one page on a single site.
UPDATE 8/13/14 – Clickdensity has been retired. Contact Box UK with any inquiries.

Error Testing

10. Don’t you just hate it when you visit a web page and something goes wrong? Random errors drive users away. A new tool, Phostir, uses a traffic light system to identify errors on high-, medium- and low-use pages. It divides mobile and desktop users at a glance too. Click on any section and you can get a report on what the errors are and how to fix them. It makes it easy to focus your attention on the pages people are visiting most to troubleshoot errors in real time.
Phostir
UPDATE 8/13/14 – Phostir is no longer available. Contact parent company Active Standards if this functionality is something you’re interested in.

Landing Page Testing

Many marketers already use A/B testing to see which version of a campaign they should run with, but this also works for usability. A couple of web tools help you to make tweaks to headings, layout and more so you can check how your site works for visitors.
11. Google Content Experiments help you set up testing on your Analytics enabled website, using up to five different versions.
12. Optimizely isn’t free, but you can use its 30-day free trial to load a page and change content. It’s included here because it is amazingly easy to use—just a few button clicks give you a whole new version of your page.

Surveying Users

One way to enhance the user experience and improve usability is to ask site visitors about their experience and provide support when they experience errors. Here are just a couple of the many tools that help you to do that.
13. UserEcho allows you to survey customers and provide support, making it a useful way to collect data on, for example, the features that users want to see on your website. It offers a limited free service.
14. iPerceptions lets you survey web visitors by inviting them at the start of their visit to take a survey at the end. You get almost immediate feedback that way. It’s a free plan, though, if you want advanced text mining and campaign assessment tools, you will need to upgrade.
15. Another site providing usability testing is IntuitionHQ, whose free plan allows you to conduct 10 live tests with unlimited questions and up to 350 participants—a big enough sample to get some useful data.

Accessibility

What stops people from interacting normally with your site? This is not just about disability but could also be about technology. Those who are using an old version of Internet Explorer probably won’t have the best experience on a modern website. Here are some tools to help with this issue.
browsershots crazyegg
16. BrowserShots tests how your site looks in an impressive array of browsers (and various versions of each browser). It can take a while, so it’s probably best to concentrate on only a few browsers at a time. Plug in your URL and eventually you get a series of screenshots of the page. Who knows? You might get a surprise.
17. The W3C Markup Validation Service has been testing web pages for standards compatibility since 1994. Type in the web address and you get a report showing errors in your HTML and XHTML markup.
18. Does your color scheme work for all users? Find out with CheckMyColors. It checks for brightness, contrast and lumosity errors, and shows sample text so you can see where the problem lies.

Multiple Tool Providers

Some providers offer a range of tools that test different aspects of the user experience. Here are three worth checking out.
19. Usability Hub has a number of tools. They aren’t free, but you can earn free tests by helping test other sites. Their tools include Five Second Test (for design), Click Test (for testing clicks on landing pages) and Nav Flow (for tracking conversion funnels).
20. Zurb offers a number of free tools to check aspects of usability. In addition to Spur, mentioned above, there’s Clue to see what people remember when they visit your site and Axe for weeding out poor web design .
21. OptimalWorkshop offers three tools for different aspects of usability and all of them have a free-for-life plan. While the freebies have some limitations, using them could help you decide whether it’s worth springing for a paid test. The tools are Chalkmark for first click testing for your web design, Optimal Sort for card sorting, and Treejack, to see how people interact with your site structure.
Use any of these tools, or a combination of them, and you’ll be well on the way to improving the usability of your site and making sure your visitors have a positive and rewarding experience. And if you get hooked on web usability and need something more than free tools, check out the premium apps listed in Smashing Magazine’s roundup of user experience testing tools.